Wednesday, December 15, 2010

Green Beans with Bacon and Mushrooms

I made this dish three times in less than two weeks...it really was that delicious. Simple ingredients, but together it tastes absolutely delicious. Corey was telling me about a dish his mom used to make with bacon and green beans, and that he really liked it. I took that idea and threw this together based on what we had and what sounded good to me. Corey liked it so much he gave it five stars (out of five. And yes, I really do make my husband rate the food I make every single time I cook. I'm probably crazy, but it lets me know how much he likes or dislikes something and whether I should make it again or not). Yes, Corey actually rated a vegetable five stars, which I didn't know was possible. I have a feeling this is going to be making a very regular appearance on our dinner table.


Green Beans with Bacon and Mushrooms
Serves 4-6 as a side dish...unless your name is Corey...then this will serve two :)

5 oz. bacon (about 5 slices), diced (uncooked)
1 lb. fresh green beans, rinsed, trimmed, and broken into pieces
1/3 cup red onion, thinly sliced
4 oz. fresh mushrooms, thinly sliced
garlic salt and fresh ground black pepper, to taste

Heat a skillet over medium heat. Cook bacon until nicely browned but not quite crispy, 5-7 minutes. Add green beans and onions. Cook until green beans are slightly tender, but still crisp (about 10 minutes). Add mushrooms and cook for 3-4 more minutes. Season with garlic salt and freshly ground black pepper to taste. Enjoy!

Wednesday, December 8, 2010

Breakfast Casserole


We had this breakfast casserole at a brunch after a baby blessing a couple of weeks ago. When Corey took his first bite he let out a big, contented sigh and said it was amazing. He then told me another 4+ times in the next 10 minutes how delicious it was. And then he did something totally unexpected. He went up to my friend's mom and asked her for the recipe, then immediately requested that I make it for dinner that night. No, I'm not joking.

This is easy and delicious, although it does take awhile to bake. But it is definitely worth it. This would be a great breakfast on Christmas morning, or any morning when you're going to be hanging around the house for awhile and will have enough time to wait for it to cook. This also makes great leftovers, so you could even bake it the night before and pop it in the oven the next morning for 15-30 minutes, until heated through and the cheese is warm and bubbly.

Breakfast Casserole
recipe from Julie Argyle

1 pkg. (24-26 oz.) frozen hash browns
1/2 cup butter
1 lb. deli ham, cubed (or breakfast sausage or bacon, cooked and crumbled...or a combination of the three)
6 eggs
1 1/2 cups milk
1/2 tsp. salt
2 cups grated cheddar cheese

1. Preheat oven to 425 degrees. Spray 9x13 baking dish with cooking spray. Spread frozen hash browns evenly in the pan. Thinly slice butter and place evenly over the hash browns (or melt butter and pour over the top of the hash browns). Bake for 25 minutes.
2. Remove hash browns from oven and turn temperature down to 350 degrees. Top hash browns evenly with ham (or sausage/bacon/or a combo).
3. Mix eggs,milk, and salt until completely combined. Pour over hash browns and meat in prepared pan. Return to oven and bake for 30 - 40 minutes, or until set and eggs are completely cooked. Top evenly with cheese and return to oven for 3-5 minutes or until cheese is completely melted.

Tuesday, November 30, 2010

Magic Bars


These are super easy and delicious, perfect for the holiday season! Plus, they are totally customizable. Don't like nuts? Add more chocolate chips instead. You can swap white chocolate chips, milk chocolate chips, mint chocolate chips, peanut butter chips or even toffee bits for some of the semi-sweet or butterscotch chips. Just make sure you have a nice tall glass of milk to enjoy with these because they are nice and rich!

Magic Bars
Adapted from Eagle Brand

1/2 cup butter, melted
1 1/2 cups graham cracker crumbs
1 can (14 oz.) sweetened condensed milk
1 1/3 cups flaked coconut
1 cup semi-sweet chocolate chips
1 cup butterscotch chips
1 cup chopped pecans (or walnuts)

1. Preheat oven to 350 degrees. 9x13 baking pan with cooking spray or line with parchment paper.
2. Mix melted butter and graham cracker crumbs in medium bowl. Press evenly along bottom of prepared pan.
3. Heat sweetened condensed milk in small bowl in microwave for 30 seconds - 1 minute, until melted slightly (this will make it easier to spread in the pan). Spread over graham cracker mixture. Top with coconut, chocolate and butterscotch chips, and nuts. Press firmly into pan.
4. Bake for 20 - 25 minutes or until lightly browned. Cool at least 10 minutes before serving. (I think they are best after about 10 minutes, so they're still warm and gooey. Pair it with a scoop of vanilla ice cream? To die for.)

Saturday, November 27, 2010

Pear Walnut Salad with Cranberry Vinaigrette

If you have some leftover cranberry sauce from Thanksgiving, this is a great (and healthy, which we all know we're needing after the overindulgence of Thanksgiving) recipe to use some of it up. It is light, refreshing, and delicious, and is a wonderful combination of textures and flavors that somehow manage to meld together perfectly. It can be a main course a side or a starter for your next holiday meal. I happened to have some mushrooms in the fridge, so I sliced them up and added them to my salad. Feel free to add them in you like, or leave them out if you would rather. It is sure to be great either way. Enjoy!


Pear Walnut Salad with Cranberry Vinaigrette
adapted from Cooking Light

Salad:
8 cups romaine lettuce, baby spinach, or mixed greens
2 pears, thinly sliced
1/2 cup thinly sliced red onion
1/3 cup blue cheese crumbles
1/4 cup chopped walnuts, toasted
1/4 cup dried cherries or cranberries

Dressing:
1/2 cup cranberry sauce
1/4 cup fresh orange juice (about 1 orange)
2 Tb. olive oil
2 Tb. balsamic vinegar
1 tsp. sugar
1/4 tsp. salt
1/8 tsp. ground ginger

1. Make vinaigrette by combining all dressing ingredients in a blender until completely combined. Set aside.
2. Layer lettuce, pears, onion, blue cheese, and walnuts on plates. Drizzle with dressing. Serve immediately. Makes 8 servings. 

Tuesday, November 23, 2010

Pumpkin Pancakes with Maple-Pecan-Brown Butter


I've been totally obsessed with brown butter lately. It turns out that almost anything is better with brown butter. (Which, to be fair, is not at all surprising. Browned, nutty, salty, fresh butter? How could that not be good?) I had some extra pumpkin after making these pumpkin cheesecakes, so I decided to make these too. It is a great way to use up some extra pumpkin and a fun way to spice up breakfast a little bit instead of the same things we always have. The pancakes were good, but the brown-butter syrup...that is heavenly. I'm sure it would be great on waffles, crepes, buttermilk pancakes, french toast, a spoon...


Pumpkin Pancakes with Maple-Pecan-Brown Butter
adapted from Taste of Home Magazine, October/November 2010


Maple-Pecan-Brown Butter
1/2 cup butter, cubed (I used salted)
1/2 cup maple syrup
1/2 tsp. ground cinnamon
1/2 cup chopped, toasted pecans

Pumpkin Pancakes

1 1/2 cups all-purpose flour
2 Tb. packed brown sugar
2 tsp. baking powder
1 tsp. salt
1 tsp. pumpkin pie spice
2 eggs
1 1/3 cups milk
3/4 cup canned pumpkin
1/2 cup vanilla yogurt

1. In small saucepan, cook butter until golden brown (about 8 - 10 minutes). Stir occasionally, and don't walk away. Once it starts to brown, it browns very quickly! Remove from heat and add the maple syrup, cinnamon, and pecans.
2. To make pancakes, whisk together eggs, milk, pumpkin, and yogurt. Add dry ingredients and mix just until combined (batter will be lumpy; don't over mix). Drop by 1/4 cupfuls onto hot greased griddle. Cook for about 3-4 minutes (until bubble form on top and keep their shape), flip and cook about 2 more minutes. Continue with remaining batter. Serve pancakes with warm maple-pecan-brown butter and fresh whipped cream.

Monday, November 22, 2010

Chocolate Sheet Cake

I know that it's Thanksgiving week and I should probably be posting Thanksgiving-themed recipes, but to be completely honest I'm not that on top of things. Instead, I'm posting this recipe for my favorite-ever chocolate cake. My mom and grandma always made this when I was growing up, and every time I eat it I think of home and all of my happy memories from when I was little. I literally cannot leave myself alone with this cake or I will eat it and eat it and eat it one little piece at a time until suddenly the entire thing is gone. It's not much to look at, but it tastes incredible!


Chocolate Sheet Cake


Cake:
2 cups flour
2 cups sugar
½ tsp. salt
½ cup butter
½ cup shortening
1 cup water
½ cup buttermilk
1/4 cup unsweetened cocoa powder
1 tsp. baking soda
2 eggs
1 tsp. vanilla

Frosting:
½ cup butter
1/4 cup unsweetened cocoa powder
1/3 cup buttermilk
1 tsp. vanilla
2 ½ cups (approx.) powdered sugar
chopped walnuts and/or mini marshmallows (optional)

  1. Preheat oven to 400 degrees. Spray jelly-roll pan with cooking spray.
  2. In bowl of large stand mixer, combine flour, sugar, and salt.
  3. In medium saucepan over medium heat, melt together butter, shortening, water, and cocoa powder. Stir frequently until well combined. Add to dry ingredients, mixing on medium speed until completely combine.
  4. Add buttermilk, eggs, vanilla, and soda. Beat on medium speed until completely combined. Batter will be very thin.
  5. Pour batter into prepared pan. Bake for 25 minutes, or until cake springs back when touched in the center. If using nuts and marshmallows, sprinkle evenly over top of cake. Frost while cake is still warm.
  6. As soon as cake comes out of the oven, immediately prepare the frosting. Boil butter, cocoa, and buttermilk in large saucepan until slightly thick, 2-3 minutes after it begins to boil. Stir constantly. Remove from heat. Add vanilla and powdered sugar and beat with an electric mixer until frosting reaches spreading consistency. Immediately spread over warm cake (or pour, if using nuts and marshmallows as it simply won't spread over the top of those).

Wednesday, November 17, 2010

Chewy Chocolate Butterscotch Cookies


I have made these twice in the past month, and Corey has declared them his favorite cookies ever. I never thought that anything would replace his deep and undying love for chocolate chip cookies...but if anything was going to, it makes sense it would be these. Chewy chocolate cookies with milk chocolate, semi-sweet, and butterscotch chips? Delish. I even substituted half whole wheat flour for the regular flour in these cookies and he still raved about them (shh...don't tell!)


I made some with white chocolate chips instead of the butterscotch chips, and while they were still really good (and slightly more photogenic), the butterscotch chips are definitely better. I suppose you could try peanut butter chips too, but why ruin a perfectly good cookie with those? (We are not big peanut butter lovers here!) I made my cookies small so that I didn't feel quite as guilty eating five of them before 11:00 a.m...but you can feel free to make them larger if you so desire, just up the cooking time accordingly.


Chewy Chocolate Butterscotch Cookies
adapted from Mrs. Harding Cooks

Makes 2 1/2 dozen small cookies (I used a 1 Tb. cookie scoop)

1 stick unsalted butter, softened
1/2 cup granulated sugar
2 Tb. brown sugar
1 egg
1/2 tsp. vanilla
1/4 cup cocoa powder
1 1/4 cups flour
1/8 tsp. salt
1/2 tsp. baking powder
3/4 cup semi-sweet chocolate chips
1/4 cup milk chocolate chips
1/2 cup butterscotch chips (or white chocolate chips or peanut butter chips)

1. Preheat oven to 350. Line baking sheet with parchment paper or lightly spray with cooking spray.
2. In medium bowl cream butter and sugars until light and fluffy. Add egg and vanilla and beat until completely combined, scraping down side of bowl to ensure everything is mixed well.
3. Add cocoa powder and mix until combined. Add flour, salt, and baking powder and mix until totally combined (do not over mix). Stir in baking chips.
4. Drop by tablespoonfuls onto prepared baking pan. Bake for 8-10 minutes (mine were perfect at 9 minutes). Be sure that you don't over bake, you want them to be firm around the edges but still nice and a little gooey in the middle. I think these are best warm right of the oven (maybe because I can't possibly wait for five minutes until they cool down) but Corey likes them cool with a tall glass of milk. Either way, they are amazing!

Tuesday, November 16, 2010

Jalapeno Jelly


Remember those amazing cheddar garlic biscuits I made last week? Well, this jelly is what I smothered them in and it was out-of-this-world-delicious. I love that sweet/spicy/salty combination, so this is right up my alley. I also had this jelly with crackers and cream cheese, and it was delicious that way too. I got this recipe at a church event (but I also found it online here)...we made this together for one of the activities. I promptly brought mine home and had to try some before it had even cooled completely...and I'm pretty sure I've eaten some if it every day since. It is addicting and delicious!

Jalapeno Jelly

1 cup red or green bell pepper, diced (we used a combination)
1/3 cup fresh jalapenos, quartered (seeded if you want it less spicy, I prefer it with seeds for a little more heat)
1 1/2 cups white vinegar
 5 cups sugar
1 pouch (3 oz.) liquid fruit pectin

1. Combine peppers and vinegar in blender. Pulse until peppers are finely chopped.
2. Combine vinegar/pepper mixture with sugar in a large saucepan. Bring to a boil and boil for 5 minutes. Remove from heat, skim foam off of the top. Cool for 2 minutes, then stir in pectin.
3. Pour into sterilized jars and fasten lids. Process with pressure cooker/water bath to seal if desired or refrigerate and store up to 2 weeks. Makes 6 half-pint jars or 3 pint jars.

Wednesday, November 10, 2010

Cheddar Garlic Biscuits


I'm not afraid of cooking. I have been cooking for as long as I can remember. My favorite toys when I was little were my little kitchen and the plastic food and dishes that came with it. I loved pretending I was making things in my kitchen and then "eating" them. I had a play-dough toy that I used to make Burger King Whoppers and fries. I had a McDonald's toy that I used to make their little apple pies (out of bread that you flatten down, applesauce, and cinnamon sugar...it makes me sick just thinking about it, but I thought it was amazing when I was seven). I started making cookies with my mom when I was too short to reach the counter by myself. I started making muffins and pie crust when I was ten.

So it was a shock to me yesterday when I realized that I had never made homemade biscuits. I'm not a huge biscuit fan, but my husband absolutely loves them. Why haven't I ever tried making them? They couldn't possibly be that difficult and I figured the from-scratch ones had to be leaps and bounds better than the ones from a can or a mix. So I decided to find me a good recipe and set to work while the baby took her nap.
I found this recipe on one of my favorite blogs, My Kitchen Cafe. Mel seems to know how to cook anything and everything, and her recipes never disappoint me. This was no exception. It was easy to throw these biscuits together, they have a great flavor, and the texture is phenomenal: light, fluffy and flaky all at the same time. These were the perfect comfort food to go with chicken and potatoes while we watched the snowflakes swirling around our yard. I had mine with homemade jalapeno jelly (YUM) and Corey enjoyed his plain, warm out of the oven. I definitely won't be waiting another 25 years to try my hand at biscuits again. I'm thinking I'll be making these often this winter...I'm already craving them again!


Cheddar Garlic Biscuits
adapted from My Kitchen Cafe

2 cups all-purpose flour
1 tablespoon baking powder
1/4 teaspoon garlic powder
1/2 teaspoon salt
2 tablespoons shortening
3 tablespoons butter, cold
1 1/4 cups grated sharp cheddar cheese
1 cup buttermilk

2 Tb. butter, melted
1/2 tsp. dried parsley
1/2 tsp. garlic powder
dash salt

1. Preheat oven to 425. Line baking sheet with parchment paper or spray with cooking spray.
2. Mix flour, baking powder, 1/4 tsp. garlic powder, and 1/2 tsp. salt in a medium bowl. Cut in the shortening and 3 Tb. butter into the flour mixture using a pastry blender, fork, or your fingers, until the mixture forms coarse crumbs. Mix in cheese (I just used my fingers). Stir in buttermilk until just moistened. Do not overmix.
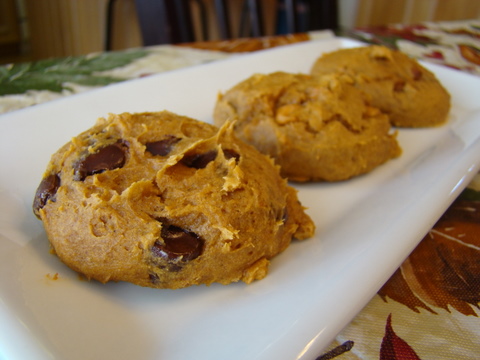
3. Drop dough onto prepared pan, using about 1/4 cup dough per biscuit. (I used a 1/4 cup cookie scoop and it worked beautifully, you could also use a tablespoon and heap it extra large or a 1/4 cup measuring cup.)
4. Bake 12 - 14 minutes or until golden brown. Mix 2 Tb. melted butter, the dried parsley, 1/2 tsp. garlic powder, and dash salt in a small bowl. Brush over warm biscuits and serve immediately.

Tuesday, October 26, 2010

Thai Peanut Sauce


It should come as no surprise to anyone that I love food. I will happily devour almost any kind of food that you place in front of me. There are two exceptions, only two things that I cannot stand to eat even the tiniest bit of: nutmeg and curry. My husband is really disappointed that I don't like curry because he loves Thai and Indian food, and it almost always has curry in it. I've been working on my aversion to curry, and I've found that I actually don't mind it is some things, as long as it's not too overpowering.

Enter this sauce. My neighbor brought us some of this with some sticky rice a few weeks ago. I thought it looked a little weird, but I tried a bite...and another...and another. I ate more for lunch the next day. And the next day. And I have literally dreamed about it several times since. She was nice enough to not only give me the recipe, but bring us MORE of it last week. (Seriously, we have the best neighbors ever!) 

Normally I don't particularly care for peanut butter, coconut, or curry, so it is a testament to the amazingness of this sauce that I can't get enough of it when it includes all three of those ingredients. I know the ingredients sound a little strange together, but trust me, it is the perfect balance of sweet, spicy, salty, and savory. I love this straight-up on top of rice, or served with chicken and veggies. Enjoy!


Thai Peanut Sauce

1 1/2 cups coconut milk
2 Tb. red curry paste
1/4 cup + 2 Tb. granulated sugar
1/4 cup fish sauce
2 Tb. tamarind liquid (or substitute brown sugar)
5 - 7 Tb. chunky peanut butter (natural peanut butter with no added sugar is recommended)

1. In medium saucepan, heat coconut milk over medium heat. Stir in curry paste and mix well to break up the paste into small pieces.
2. When the milk/curry mixture heats up and red oil is simmering on the top, stir in remaining ingredients. Boil until desired thickness is reached (about 2 - 5 minutes). Serve with rice, chicken, veggies, etc. as desired.

Thursday, October 21, 2010

Ridiculously Easy Pumpkin Chocolate Chip Cookies


I love pumpkin. Whether it's in pumpkin pie, pumpkin bread, pumpkin bars, pumpkin cheesecake, pumpkin gingerbread waffles, pumpkin cake, or these cookies, it always seems to hit the spot. I'll freely admit that I eat pumpkin treats all year round, but once fall hits and Halloween starts inching closer I can't think about much else (I only wish I was exaggerating). When a pumpkin craving hits and I don't have time to make anything labor-intensive, I like to whip these cookies up. There are 3 ingredients, and they can be mixed and in the oven in less than 5 minutes. This is the easiest, most fool-proof recipe I've ever made, and they couldn't be more delicious: moist, cakey, chocolatey and perfect every single time.


This time I even mixed things up and made some with cinnamon chips and butterscotch chips, as well as some with chocolate chips. They were all delicious and you better believe that I will be making these several times before winter comes!

Pumpkin Chocolate Chip Cookies
Makes 3 dozen cookies

1 can (15 oz.) pumpkin (not pumpkin pie filling, just plain old pumpkin puree)
1 (18.25 oz) spice cake mix
1 - 2 cups semi-sweet chocolate chips (or your favorite flavor)

Preheat oven to 350 degrees. Mix all ingredients (adjusting the amount of chocolate chips based on your personal taste). Drop by rounded tablespoonfuls onto greased baking pan, flatten slightly with back of spoon or fingers (otherwise they will be very round and puffy). Bake for 10 - 15 minutes (I used my 1 1/2 tablespoon cookie scoop and baked for 13 minutes and they were absolutely perfect). Enjoy!

Garlic Chicken Parmesan


This was quick and delicious. I love that it is baked instead of fried, but still had a nice crispy exterior. We had this along with pasta, homemade marinara sauce, my favorite breadsticks and broccoli and it was a wonderful fall meal. Enjoy!


Garlic Chicken Parmesan

4 small chicken breasts (about 1 pound)
salt and pepper
2 cloves garlic, minced (or 1/4 tsp. garlic powder)
3 Tb. olive oil
1/2 cup panko bread crumbs (this makes it nice and light and crispy. If you don't have any panko, you can substitute an additional 1/2 cup Italian seasoned bread crumbs)
1/2 cup Italian seasoned bread crumbs
1/2 cup shredded Parmesan cheese
1/2 tsp. dried parsley flakes
1/4 tsp. dried basil
marinara sauce and additional Parmesan cheese for serving

1. Preheat oven to 350 degrees. Spray baking pan with non-stick cooking spray. (I like to use a short cooling rack set inside a baking pan this helps the chicken to get crunchy on all sides instead of soggy on the bottom part that touches the pan, but make sure you spray the rack so the chicken doesn't stick!)
2. Combine garlic and olive oil in pie pan or flat bowl. Combine panko, bread crumbs, Parmesan cheese, parsley, and basil in a separate pie pan or flat bowl.
3. Trim chicken of any fat, and pound chicken with rolling pin or meat tenderizer to 1/2 inch thickness (this is so the meat will cook evenly).
4. Dip each chicken breast in oil, rubbing to coat well, then into the bread crumb/cheese mixture, pressing the bread crumbs into the chicken to ensure it is completely covered. Place on baking tray. If there is extra bread crumb/cheese mixture, sprinkle over the chicken, if desired.
5. Bake for 25 - 30 minutes or until juices run clear and chicken is no longer pink in center. Serve with warm marinara sauce and additional Parmesan cheese.

Wednesday, October 20, 2010

Classic Marinara Sauce


I'm still getting lots and lots of tomatoes from the garden. In an attempt to use some of them up, I decided to whip up some marinara sauce. This is a simple, classic marinara with lots of tomato and veggie flavor. I substituted fresh, peeled and seeded tomatoes (3-4 pounds) plus a small can of tomato paste, for the canned tomatoes, but I am sure it would be great with the canned tomatoes too. This was perfect served on top of some spaghetti and chicken Parmesan (recipe coming later this week). I'm thinking I'll use the rest for calzones later this week!

Classic Marinara Sauce
Adapted from My Kitchen Cafe

2 Tb. olive oil
3 cloves garlic, minced or pressed
1 small onion, finely chopped (1/2 - 2/3 cup)
1 stalk celery, chopped (1/4 - 1/3 cup)
1 carrot, peeled and chopped (1/3 cup)
1/2 tsp. salt
1/2 tsp. freshly ground black pepper
2 cans (28 oz. each) crushed tomatoes
1/2 Tb. dried basil
1/2 Tb. dried oregano
1/2 Tb. dried parsley
1/4 tsp. marjoram
2 dried bay leaves
1 Tb. brown sugar
2 Tb. butter

Heat oil in large pot, Add garlic, onion, celery, and carrots and cook until onion is translucent and lightly browned and veggies are tender. Add salt and pepper and stir well. Add tomatoes, basil, oregano, parsley, marjoram, and bay leaves. Simmer, covered, on low heat for about 1 hour, stirring occasionally, until sauce is thickened. remove bay leaves and stir in brown sugar and butter. Cool slightly, then blend in food processor until desired consistency is reached (I like mine fairly smooth). Make about 7 cups sauce.

Monday, October 18, 2010

Pulled Pork Sandwiches

My husband normally doesn't like pork. At all. Every once in awhile I'll throw it into the rotation just for a little variety, but I never expect him to like it a whole lot. Saturday I was craving BBQ but didn't want to go all the way outside (an entire 20 feet from my kitchen, poor me) and grill. Instead I settled on these pulled pork sandwiches. I threw everything in the crock pot in the morning, and it was perfectly cooked 8 hours later. It took less than 5 minutes of work and the results were spectacular. Juicy, smoky, flavorful, falling-apart, melt-in-your mouth tender. My husband loved these and said he never knew pork could taste so great. The leftovers lasted less than 24 hours, which is nothing short of a miracle. This definitely has our stamp of approval, and I hope you'll enjoy it as much as we did!


Pulled Pork Sandwiches
Adapted from My Kitchen Cafe

1 boneless pork shoulder or pork loin (2-3 pounds, mine was about 2 pounds and it made 6-8 sandwiches)
3/4 tsp. fresh ground black pepper
1 tsp. garlic salt
1/4 tsp. smoked paprika or chipotle chili powder (optional, but I love a little kick)
2 cups water
1 Tb. hickory flavored Liquid Smoke (you can usually find this by the Worcestershire sauce and BBQ sauce)
1 1/2 cups barbecue sauce
buns, for serving

Rinse pork in cold water and pat dry. Combine pepper, garlic salt, and paprika or chili powder. Rub all over pork shoulder, making sure to cover well. Place pork in crock pot. Cover with water and liquid smoke. Cook on low for 7-10 hours, until pork is tender and falling apart. Remove pork, drain liquid. Shred the pork and return to the crock pot and add 1 1/2 cups barbecue sauce. Stir to coat and cook on low for 20 minutes, until sauce is absorbed and heated through. Serve on buns with additional barbecue sauce if desired.

Monday, September 27, 2010

Brownie Chocolate Cheesecake Cupcakes


Cheesecake: Good.
Cupcakes: Great.
Chocolate: Delicious.
Brownies: Divine.
Chocolate Brownie Cheesecake Cupcakes: Amazing!

These were fast, delicious, and look gourmet. You really can't go wrong!


Brownie Chocolate Cheesecake Cupcakes
Adapted from Pillsbury

1 box fudge brownie mix (19.5 oz)
1/2 cup oil
1/4 cup water
4 eggs
1 cup semisweet chocolate chips, melted and cooled to room temperature
2 pkg. (8 oz. each) softened cream cheese
1/2 cup sugar
1 container (6 oz.) vanilla yogurt
1/2 tsp. vanilla
hot fudge, whipped cream, and raspberries if desired

1. Preheat oven to 350 degrees. Line 24 muffin cups with paper liners.
2. Prepare brownie mix using 1/2 cup oil, 1/4 cup water, and 2 eggs. Divide evenly among cupcake liners. Bake for 15 minutes.
3. Meanwhile, beat cream cheese and sugar with electric mixer on medium speed. Add yogurt and vanilla and beat until smooth. Add eggs, 1 at a time, beating well after each addition. Add chocolate and beat until completely blended and no white streaks remain.
4. Divide cheesecake mixture evenly over the warm brownies. Return to oven and bake 15 - 20 minutes or until set. Cool completely, then refrigerate at least 2 hours before serving. Top with hot fudge, raspberries, and fresh whipped cream if desired.

Tuesday, September 14, 2010

Perfect White Frosting


Corey doesn't like frosting. And by "doesn't like" I mean "scrapes it off of everything that I put it on." So when I say that Corey loves this frosting, that means it's really, really good. It's light and creamy, and not too sweet, almost like whipped cream. It is the perfect accompaniment to white, chocolate or lemon cake (and probably many others) and I must admit that I have been known to eat the leftovers straight out of the bowl with a spoon.

This is probably the strangest frosting recipe that I've ever tried (flour in frosting? What?) but the results are phenomenal. I'll say right now that the frosting can be very fickle, so don't try varying from the recipe at all. The only luck I've had in changing the recipe is changing the flavoring (substituting almond extract for half of the vanilla, or stirring in crushed oreos once the frosting is complete). If you want a chocolate frosting that is similar, see the recipe here. Enjoy!

Perfect White Frosting
recipe by ourbestbites.com
Enough to frost 12 - 24 cupcakes, depending on how much frosting you like. I like a lot of frosting (especially when it's nice and fluffy like this) so I usually get about 16 - 18 cupcakes frosted with this recipe. 

3 T Flour
1/2 C milk, preferably whole milk
1/2 C real butter (NO SUBSTITUTES!) 
1/2 C granulated sugar (NOT powdered sugar)
1 t vanilla extract

Whisk together the flour and the milk. Heat in a small sauce pan on medium heat. Cook, stirring continually, until mixture is thickened (you should be able to see the bottom of the pan when stirring. It is better to make it too thick than too thin, so if you're doubting that it's done, keep cooking for a couple more minutes. I think I cook mine for about 5-7 minutes). Stir in vanilla. If there are any lumps, push the mixture through a fine mesh strainer to remove the lumps. Cool completely to room temperature (I put mine in the fridge and cool until it is completely cold). This part is critical, if it doesn't cool completely it will melt the butter and you'll be stuck with a goopy blob of runny frosting.

It an electric stand mixer fitted with the whisk attachment, cream the butter and the sugar until light and fluffy. Turn to medium-low speed and slowly add the completely chilled flour/milk mixture. Beat on high until mixture is light and fluffy and well combined, about 7 minutes. (When you first start beating it, the mixture will not look like it's going to combine. Just keep beating for the full 7+ minutes and the result should be a nice, fluffy frosting).

This frosting is best if served immediately. It separates if it stands more than a day (and if it is refrigerated) so plan accordingly.

Thursday, September 9, 2010

Whole Wheat Banana Muffins


These muffins are absolutely amazing. Want to know how amazing? Last night, I skipped dessert and had another one of these instead. Yeah. If that's not a shining review, I don't know what is (especially since dessert was this delicious cake, it's one of my favorites).
Now normally I'm not too big on banana bread, and mashing up the bananas literally makes me gag (I have weird issues with over-ripe bananas). But I will mash bananas any day for these delicious muffins. As an added bonus, they are healthier than normal (with whole wheat, honey, and light sour cream). I made half of these with cinnamon chips (like chocolate chips, but cinnamon flavored, Hershey's makes a good one) and half with a streusel topping...and both were great, but to be totally honest I think I liked the ones with the cinnamon chips better (which is great because that cuts even more fat and calories). I had all sorts of intentions of freezing part of these to pull out for quick breakfasts later in the week, but I doubt they'll last until the end of the day.
  
Whole Wheat Banana MuffinsRecipe adapted from Cooking Light via Our Best Bites


Muffins:
3/4 c. all-purpose flour
1 1/4 c. whole wheat flour
3/4 tsp. baking soda
1/2 tsp. salt
1 t. cinnamon
2/3 c. sugar
1/4 c. honey
1/4 c. butter, softened
2 large eggs
1 1/2 c. mashed very ripe banana (I used 5 small bananas)
1/3 c. low-fat sour cream or plain yogurt
1 1/2 tsp. vanilla extract

Streusel Topping (optional):
1/2 c. pecans, chopped
6 Tb. packed brown sugar
3 Tb. whole wheat flour
2 Tb. cold butter

OR 1 cup cinnamon chips (instead of streusel)


Preheat the oven to 350. Line a muffin pan with 18-20 paper liners.

In a large mixing bowl, cream together the sugar, honey, and butter. Add each egg in one at a time, mixing until fluffy and well blended. Add the mashed banana, sour cream, and vanilla. Slowly add in remaining muffin ingredients, mixing until just combined.

Divide the batter evenly (so the cups are about 2/3 full) among 18-20 muffin tins. Combine the streusel ingredients and sprinkle them on top of the batter, or sprinkle with cinnamon chips if desired. Bake for 18 - 20 minutes or until a toothpick inserted into the center of a muffin comes out clean.

Wednesday, September 1, 2010

Triple Chocolate Zucchini Cake

Did you know that zucchini could look like this?


I know, right? Pretty freaking amazing. In case you can't tell from all of the zucchini recipes I've been posting, we have had a killer crop of zucchini from our garden this year. Corey remembered his mom making a delicious chocolate zucchini cake, so we got a recipe from her. I made several adaptations to it, and ended up serving it with whipped cream and fresh raspberries (because I'm convinced that everything is better with whipped cream and raspberries). It was delicious, and you would never guess it had zucchini in it. The result is simply a super-moist and chocolatey bundt cake.


Triple Chocolate Zucchini Cake

Cake:
2 1/2 cups flour
1/2 cup unsweetened baking cocoa
2 1/2 tsp. baking powder
1 1/2 tsp. baking soda
1 tsp. salt
1/2 cup butter, softened
1/4 cup applesauce
1 1/2 cups sugar
3 large eggs
2 tsp. vanilla
2 cups shredded zucchini
1/2 cup milk
1 cup semi-sweet chocolate chips

Topping:
1/2 cup semi-sweet chocolate chips
3 Tb. whipping cream
Fresh whipped cream and raspberries, if desired

1. Preheat oven to 350 degrees. Grease and flour bundt pan.
2. Cream butter and sugar. Add applesauce. Add eggs, 1 at a time, beating well after each addition. Add vanilla and zucchini. Add flour, cocoa, powder, soda, salt, and milk and beat until smooth. Stir in 1 cup chocolate chips.
3. Pour into baking pan and bake for 45 - 55 minutes or until top is dry and toothpick inserted into center of cake comes out clean. Cool 10 minutes, then remove from pan to cool.
4. Meanwhile, heat 1/2 cup chocolate chips and 3 Tb. whipping cream in microwave for 30 seconds. Stir until completely melted and drizzle over cake. Serve warm with whipped cream and raspberries if desired.

Friday, August 27, 2010

Chocolate Chip Paradise Pie

This is one of my all-time favorite desserts. Whenever we go to Chili's, I try to talk Corey into getting this (it's not too hard to convince him, he loves it too). Since I know that I'll probably be full after eating my dinner, we get it as an appetizer instead. It's a whole lot easier to bring home the rest of my meal as leftovers than it is to bring this home! I adapted this recipe from one I found online and it is absolutely divine. I can't get enough of it!

Chocolate Chip Paradise Pie

Crust:
4 Tb. Butter, melted
2 Tb. sugar
1 cup cinnamon graham crackers, finely crushed (or 1 cup regular graham crackers, crushed plus 1/2 tsp. cinnamon)
1 1/4 cups semi-sweet chocolate chips

Cookie:
1/2 cup unsalted butter, softened
1/3 cup brown sugar
1 large egg
1 tsp. vanilla
1 cup flour
1/2 tsp. baking soda
1/4 tsp. baking powder
1/4 tsp. salt
1/2 cup shredded coconut
1/2 cup chopped walnuts

For serving:
vanilla ice cream
chocolate syrup
caramel syrup
chopped walnuts

1. Preheat oven to 325 degrees. Grease 9 x 9 inch baking pan. Prepare crust by mixing 4 Tb. melted butter and 2 Tb. sugar. Add graham crackers and press into baking pan. Sprinkle with chocolate chips.
2. Prepare cookie layer by creaming 1/2 cup butter and brown sugar. Add egg and vanilla and mix until smooth. Add flour, soda, powder, and salt and mix until blended. Stir in coconut. Press cookie mixture over the chocolate chips. Sprinkle with 1/2 cups walnuts and press into cookie layer.
3. Bake for 25 - 30 minutes or until light golden brown. Serve warm with vanilla ice cream, chocolate, caramel, and additional chopped walnuts.

Thursday, August 26, 2010

Cafe Rio-Style Burritos


Have you been to Cafe Rio? It is a Mexican restaurant here in Utah that I absolutely love. Their burritos and salads are both wildly addicting. Since I could pretty much eat it every week for the rest of my life, I figured I better figure out how to make it at home so I don't spend all of my money there. Here is a recipe for a delicious, smothered burrito a la Cafe Rio. You can really do this burrito any way you want to. Don't like green sauce? Use a can of red enchilada sauce instead. Not too crazy about black beans? Use refried. You really can't go wrong here. It's a delicious meal (one that we love having when we have friends over) and everyone seems to love it. The recipes for each of the main ingredients in this recipe have already been posted, so I've included the links below (just click on the name of each component to view the recipe). Enjoy!

Cafe Rio-Style Burritos

Sweet Mexican Rice
Honey Chipotle Black Beans (I only use 1 chipotle pepper in the whole batch and it is plenty spicy for me)
Fajita Chicken
Salsa Verde
Tortillas
Shredded Chedder or Monterey Jack Cheese
Pico de Gallo
Sour Cream

For each burrito, layer about 1/4 cup each of rice, beans, and chicken. Top with 2 Tb. cheese. Roll up burrito-style and place in a baking pan. Cover each burrito with 1/4 cup salsa verde and sprinkle with 1 - 2 Tb. cheese. Bake in 350 degree oven for 5-10 minutes, or until sauce is warm and cheese is melted. Top with pico de gallo and sour cream.

Wednesday, August 25, 2010

Salsa Verde

This is a recipe I got from my parents' neighbor. Her husband is from Mexico and is a professional chef, so he definitely knows what he is doing when it comes to this stuff! I use it both as a dip for chips, and also as enchilada sauce, or to smother burritos with. This makes a lot, but can be easily halved. It also freezes great, so I would recommend making the full batch and freezing half for the next time you want it. Enjoy!

Salsa Verde (Green Enchilada Sauce)

2 lbs. tomatillos, husks removed
2 cloves garlic
2 jalapenos, halved and seeded
1 medium onion, quartered
3 chicken bullion cubes
3 cups water
1 Tb. sugar (optional)
1/2 tsp. cumin
1/2 cup chopped cilantro
1 (4 oz) can chopped green chilies
salt and pepper to taste

1. Rinse tomatillos to remove the stickiness. Pound each garlic clove to open (don't chop). Place tomatillos, garlic, jalapenos, onion, bullion, and water in large pot. Boil until tomatillos and onion are tender, about 10 minutes. Add sugar, if desired, and stir to dissolve (this cuts down the acidity from the tomatillos).
2. Drain tomatillo mixture (reserving the juices) and place the tomatillo mixture and 1/2 cup of juices in a blender. Add cumin, chilies and cilantro. Blend until smooth, adding more liquid as needed to reach your desired consistency. Season with salt and pepper to taste.

Tuesday, August 24, 2010

Sweet Mexican Rice


This is a perfect Mexican side dish, or perfect wrapped up in a delicious burrito. I made a big batch of this last week and used it as a side for quesadillas, inside a hugely delicious burrito, and on top of a yummy salad. It's quick and simple, but full of flavor--a nice change from your average white rice.

Sweet Mexican Rice
serves 6 - 8

2 Tb. butter
1/2 medium yellow onion, finely diced
1/2 red bell pepper, finely diced
2 cloves garlic, minced
1 1/2 cups white rice
3 cubes chicken bullion
3 cups water
2 Tb. sugar
juice of 1 lime
2 Tb. cilantro, finely chopped (optional)

1. Melt butter in large pot over medium-high heat. Add onion, pepper, and garlic. Saute until translucent. Add rice and cook until lightly browned. Add chicken bullion and water, cover and simmer over low heat for 25 minutes or until water is completely cooked out. Let stand 5 minutes.
2. Mix lime juice with sugar, pour over rice and fluff with a fork. Top with cilantro if desired.

Monday, August 23, 2010

Pico de Gallo


I love Mexican food. Corey and I probably eat Mexican food more than any other cuisine. Something about the freshness and spiciness just entices me every time. With so many tomatoes, peppers, and even a few onions from our garden, it's the perfect time to make a big batch of Pico de Gallo to go with any of your favorite Mexican foods (I had it with this amazing Bajio Chicken Green Chile Salad, and it is also great with my favorite Enchiladas, Taquitos, Southwestern Beef Wraps, or a delicious Cafe-Rio Style Burrito...I'll be posting that recipe later this week). Enjoy!

Pico de Gallo

2 cups diced fresh tomatoes (I like to use seeded Roma tomatoes because they are nice and firm, you'll need about 5 medium)
1/2 cup diced red onion
3 Tb. chopped fresh cilantro
Juice of 1/2 lime
1/2 - 1 jalapeno, seeded and minced (depending on how spicy you like it)
1/4 cup diced green pepper (optional, I throw this is if I have it on hand but it won't make or break the salsa)
garlic salt
fresh ground black pepper

Combine all ingredients and season with garlic salt and pepper to taste. Serve immediately or refrigerate up to 3 days. Eat with chips and dip or serve with your favorite Mexican dish, you really can't go wrong with this stuff, it is delicious!

Thursday, August 19, 2010

Pickled Cucumber Salad

I love this salad: let me just get that out in the open right now. This is a salad that my sister Mica has made for several family get-togethers. Every time she makes it, I savor it and love every bite, then beg for the recipe...and then she promptly forgets to give it to me. I was finally able to get the recipe from her (because I needed to bring this to her birthday dinner!) and I am thrilled to be able to make it any time I want to now.

It's super simple (only 5 ingredients) and even quicker if you use a food processor to slice the cucumbers. This is a great way to use up extra cucumbers from your garden (and shallots and jalapenos if you grow those too--our jalapenos died but our shallots did great!). It tastes fresh and delicious, just perfect for enjoying during these last weeks of summer (can you tell I'm going through summer-is-ending denial? I keep posting all sorts of summery recipes because I want to hang on to summer just as long as I can). We served this with Thai chicken, rice, and Matt's Thai Chicken soup (how do we not have a picture of that? It is amazing)! I had the leftovers the next day with a BLT. Pretty much, it's good with just about anything, and makes for a very refreshing side dish!

Pickled Cucumber Salad

2 English (hot house) cucumbers, thinly sliced
2 Tb. salt
4 medium shallots, thinly sliced
2 jalapenos, seeded and minced
1/2 cup rice wine vinegar
1/4 cup + 2 Tb. granulated sugar

1. Toss sliced cucumber with salt (the salt draws the excess liquid out of the cucumber, this is important so that the salad is not waterery). Let stand for 30 minutes at room temperature, discard liquid, and pat cucumber dry with paper towels.
2. Toss together cucumbers, shallots, and jalapenos. Combine vinegar and sugar in small bowl and mix well. Pour over cucumber mixture and stir to combine. Serve immediately or refrigerate up to 24 hours. (I think this is best about 2 hours after it is made, that way the cucumber has time to soak up the vinegar but it doesn't get mushy).

Wednesday, August 18, 2010

Perfect Vanilla Ice Cream

Nothing says summer like cold, creamy, homemade vanilla ice cream. This is a super-simple ice cream recipe with no eggs in it, but it still manages to be extra creamy. I've already made this twice in the last week--first on top of warm peach cobbler, then on top of warm cookie bars, then on top of my mom's homemade chocolate sheet cake (recipe to come soon), and finally just by itself as a just-before-bed snack. It is perfectly delicious any way you eat it. Hurry and enjoy this as you soak up these last few weeks of summer!

Perfect Vanilla Ice Cream
adapted from Alton Brown

1 2/3 cups heavy whipping cream
1 1/3 cups milk
3/4 cup + 2 Tb. granulated sugar
1 vanilla bean, split and scraped
2 tsp. vanilla extract
dash salt

In large pot, scrape vanilla bean into sugar. Rub until well combined. Stir in whipping cream milk, vanilla, and salt. Add vanilla bean pod. Cook over medium-low heat until sugar is dissolved (do not boil). Remove from heat and cool completely in refrigerator for at least 2 hours. Freeze according to ice cream maker instructions. Enjoy!

Monday, August 16, 2010

Monterey Chicken

Not only does this look delicious (it's one of my favorites to make when we have company over) but it is super tasty! Really, how can you go wrong with grilled marinated chicken topped with barbecue sauce, cheese, and bacon? Garnish with some fresh chives or scallions and you've got yourself a showstopper! This is a great recipe to enjoy before the end of summer and the end of grilling season.

Monterey Chicken

Marinade:
1/4 cup fresh lime juice
1/3 cup water
2 Tb. canola oil
1 clove garlic, minced
1 Tb. vinegar
2 tsp. soy sauce
1/2 tsp. liquid smoke
1 tsp. salt
1/2 tsp. chili powder (I like to use half regular and half chipotle)
1/2 tsp. cayenne pepper
1/4 tsp. black pepper
dash onion powder
1/2 of a 12 oz. can Sprite or 7-up

4 small boneless, skinless chicken breasts (about 1 lb.)
4 slices bacon, cooked crisply and sliced in half horizontally
1/4 cup barbecue sauce (I prefer bulls-eye)
1/2 cup shredded cheddar or colby-jack cheese
sliced chives or scallions and/or diced tomatoes for garnish (optional)

1. Combine all marinade ingredients in gallon-size ziploc bag. Add chicken and shake to cover chicken completely. Refrigerate for at least 1 hour or up to 24 hours.
2. Grill chicken over medium-high heat for 5-7 minutes per side or until cooked through. Immediately top each piece with 1 Tb. barbecue sauce, 2 Tb. cheese, and 2 bacon pieces (1 slice, halved). Sprinkled with chives, scallions and/or diced tomatoes to taste. Serve immediately!

This is also my favorite fajitas recipe, see the recipe here, so you can grill up double the amount of chicken you need and make fajitas or quesadillas with the extra chicken the next night!
Related Posts Plugin for WordPress, Blogger...