Tuesday, November 16, 2010
Jalapeno Jelly
Remember those amazing cheddar garlic biscuits I made last week? Well, this jelly is what I smothered them in and it was out-of-this-world-delicious. I love that sweet/spicy/salty combination, so this is right up my alley. I also had this jelly with crackers and cream cheese, and it was delicious that way too. I got this recipe at a church event (but I also found it online here)...we made this together for one of the activities. I promptly brought mine home and had to try some before it had even cooled completely...and I'm pretty sure I've eaten some if it every day since. It is addicting and delicious!
Jalapeno Jelly
1 cup red or green bell pepper, diced (we used a combination)
1/3 cup fresh jalapenos, quartered (seeded if you want it less spicy, I prefer it with seeds for a little more heat)
1 1/2 cups white vinegar
5 cups sugar
1 pouch (3 oz.) liquid fruit pectin
1. Combine peppers and vinegar in blender. Pulse until peppers are finely chopped.
2. Combine vinegar/pepper mixture with sugar in a large saucepan. Bring to a boil and boil for 5 minutes. Remove from heat, skim foam off of the top. Cool for 2 minutes, then stir in pectin.
3. Pour into sterilized jars and fasten lids. Process with pressure cooker/water bath to seal if desired or refrigerate and store up to 2 weeks. Makes 6 half-pint jars or 3 pint jars.
Wednesday, November 10, 2010
Cheddar Garlic Biscuits
I'm not afraid of cooking. I have been cooking for as long as I can remember. My favorite toys when I was little were my little kitchen and the plastic food and dishes that came with it. I loved pretending I was making things in my kitchen and then "eating" them. I had a play-dough toy that I used to make Burger King Whoppers and fries. I had a McDonald's toy that I used to make their little apple pies (out of bread that you flatten down, applesauce, and cinnamon sugar...it makes me sick just thinking about it, but I thought it was amazing when I was seven). I started making cookies with my mom when I was too short to reach the counter by myself. I started making muffins and pie crust when I was ten.
So it was a shock to me yesterday when I realized that I had never made homemade biscuits. I'm not a huge biscuit fan, but my husband absolutely loves them. Why haven't I ever tried making them? They couldn't possibly be that difficult and I figured the from-scratch ones had to be leaps and bounds better than the ones from a can or a mix. So I decided to find me a good recipe and set to work while the baby took her nap.
I found this recipe on one of my favorite blogs, My Kitchen Cafe. Mel seems to know how to cook anything and everything, and her recipes never disappoint me. This was no exception. It was easy to throw these biscuits together, they have a great flavor, and the texture is phenomenal: light, fluffy and flaky all at the same time. These were the perfect comfort food to go with chicken and potatoes while we watched the snowflakes swirling around our yard. I had mine with homemade jalapeno jelly (YUM) and Corey enjoyed his plain, warm out of the oven. I definitely won't be waiting another 25 years to try my hand at biscuits again. I'm thinking I'll be making these often this winter...I'm already craving them again!
Cheddar Garlic Biscuits
adapted from My Kitchen Cafe
2 cups all-purpose flour
1 tablespoon baking powder
1/4 teaspoon garlic powder
1/2 teaspoon salt
2 tablespoons shortening
3 tablespoons butter, cold
1 1/4 cups grated sharp cheddar cheese
1 cup buttermilk
2 Tb. butter, melted
1/2 tsp. dried parsley
1/2 tsp. garlic powder
dash salt
1. Preheat oven to 425. Line baking sheet with parchment paper or spray with cooking spray.
2. Mix flour, baking powder, 1/4 tsp. garlic powder, and 1/2 tsp. salt in a medium bowl. Cut in the shortening and 3 Tb. butter into the flour mixture using a pastry blender, fork, or your fingers, until the mixture forms coarse crumbs. Mix in cheese (I just used my fingers). Stir in buttermilk until just moistened. Do not overmix.
3. Drop dough onto prepared pan, using about 1/4 cup dough per biscuit. (I used a 1/4 cup cookie scoop and it worked beautifully, you could also use a tablespoon and heap it extra large or a 1/4 cup measuring cup.)
4. Bake 12 - 14 minutes or until golden brown. Mix 2 Tb. melted butter, the dried parsley, 1/2 tsp. garlic powder, and dash salt in a small bowl. Brush over warm biscuits and serve immediately.
Tuesday, October 26, 2010
Thai Peanut Sauce
It should come as no surprise to anyone that I love food. I will happily devour almost any kind of food that you place in front of me. There are two exceptions, only two things that I cannot stand to eat even the tiniest bit of: nutmeg and curry. My husband is really disappointed that I don't like curry because he loves Thai and Indian food, and it almost always has curry in it. I've been working on my aversion to curry, and I've found that I actually don't mind it is some things, as long as it's not too overpowering.
Enter this sauce. My neighbor brought us some of this with some sticky rice a few weeks ago. I thought it looked a little weird, but I tried a bite...and another...and another. I ate more for lunch the next day. And the next day. And I have literally dreamed about it several times since. She was nice enough to not only give me the recipe, but bring us MORE of it last week. (Seriously, we have the best neighbors ever!)
Normally I don't particularly care for peanut butter, coconut, or curry, so it is a testament to the amazingness of this sauce that I can't get enough of it when it includes all three of those ingredients. I know the ingredients sound a little strange together, but trust me, it is the perfect balance of sweet, spicy, salty, and savory. I love this straight-up on top of rice, or served with chicken and veggies. Enjoy!
Thai Peanut Sauce
1 1/2 cups coconut milk
2 Tb. red curry paste
1/4 cup + 2 Tb. granulated sugar
1/4 cup fish sauce
2 Tb. tamarind liquid (or substitute brown sugar)
5 - 7 Tb. chunky peanut butter (natural peanut butter with no added sugar is recommended)
1. In medium saucepan, heat coconut milk over medium heat. Stir in curry paste and mix well to break up the paste into small pieces.
2. When the milk/curry mixture heats up and red oil is simmering on the top, stir in remaining ingredients. Boil until desired thickness is reached (about 2 - 5 minutes). Serve with rice, chicken, veggies, etc. as desired.
Thursday, October 21, 2010
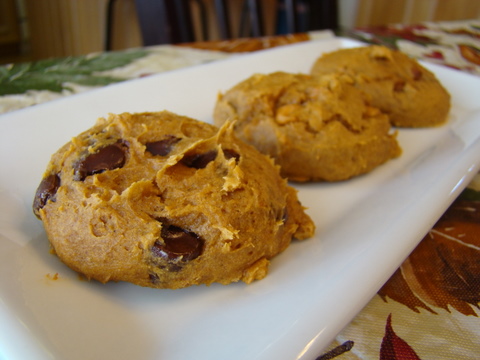
Ridiculously Easy Pumpkin Chocolate Chip Cookies
I love pumpkin. Whether it's in pumpkin pie, pumpkin bread, pumpkin bars, pumpkin cheesecake, pumpkin gingerbread waffles, pumpkin cake, or these cookies, it always seems to hit the spot. I'll freely admit that I eat pumpkin treats all year round, but once fall hits and Halloween starts inching closer I can't think about much else (I only wish I was exaggerating). When a pumpkin craving hits and I don't have time to make anything labor-intensive, I like to whip these cookies up. There are 3 ingredients, and they can be mixed and in the oven in less than 5 minutes. This is the easiest, most fool-proof recipe I've ever made, and they couldn't be more delicious: moist, cakey, chocolatey and perfect every single time.
This time I even mixed things up and made some with cinnamon chips and butterscotch chips, as well as some with chocolate chips. They were all delicious and you better believe that I will be making these several times before winter comes!
Pumpkin Chocolate Chip Cookies
Makes 3 dozen cookies
1 can (15 oz.) pumpkin (not pumpkin pie filling, just plain old pumpkin puree)
1 (18.25 oz) spice cake mix
1 - 2 cups semi-sweet chocolate chips (or your favorite flavor)
Preheat oven to 350 degrees. Mix all ingredients (adjusting the amount of chocolate chips based on your personal taste). Drop by rounded tablespoonfuls onto greased baking pan, flatten slightly with back of spoon or fingers (otherwise they will be very round and puffy). Bake for 10 - 15 minutes (I used my 1 1/2 tablespoon cookie scoop and baked for 13 minutes and they were absolutely perfect). Enjoy!
Garlic Chicken Parmesan
This was quick and delicious. I love that it is baked instead of fried, but still had a nice crispy exterior. We had this along with pasta, homemade marinara sauce, my favorite breadsticks and broccoli and it was a wonderful fall meal. Enjoy!
Garlic Chicken Parmesan
4 small chicken breasts (about 1 pound)
salt and pepper
2 cloves garlic, minced (or 1/4 tsp. garlic powder)
3 Tb. olive oil
1/2 cup panko bread crumbs (this makes it nice and light and crispy. If you don't have any panko, you can substitute an additional 1/2 cup Italian seasoned bread crumbs)
1/2 cup Italian seasoned bread crumbs
1/2 cup shredded Parmesan cheese
1/2 tsp. dried parsley flakes
1/4 tsp. dried basil
marinara sauce and additional Parmesan cheese for serving
1. Preheat oven to 350 degrees. Spray baking pan with non-stick cooking spray. (I like to use a short cooling rack set inside a baking pan this helps the chicken to get crunchy on all sides instead of soggy on the bottom part that touches the pan, but make sure you spray the rack so the chicken doesn't stick!)
2. Combine garlic and olive oil in pie pan or flat bowl. Combine panko, bread crumbs, Parmesan cheese, parsley, and basil in a separate pie pan or flat bowl.
3. Trim chicken of any fat, and pound chicken with rolling pin or meat tenderizer to 1/2 inch thickness (this is so the meat will cook evenly).
4. Dip each chicken breast in oil, rubbing to coat well, then into the bread crumb/cheese mixture, pressing the bread crumbs into the chicken to ensure it is completely covered. Place on baking tray. If there is extra bread crumb/cheese mixture, sprinkle over the chicken, if desired.
5. Bake for 25 - 30 minutes or until juices run clear and chicken is no longer pink in center. Serve with warm marinara sauce and additional Parmesan cheese.
Wednesday, October 20, 2010
Classic Marinara Sauce
I'm still getting lots and lots of tomatoes from the garden. In an attempt to use some of them up, I decided to whip up some marinara sauce. This is a simple, classic marinara with lots of tomato and veggie flavor. I substituted fresh, peeled and seeded tomatoes (3-4 pounds) plus a small can of tomato paste, for the canned tomatoes, but I am sure it would be great with the canned tomatoes too. This was perfect served on top of some spaghetti and chicken Parmesan (recipe coming later this week). I'm thinking I'll use the rest for calzones later this week!
Classic Marinara Sauce
Adapted from My Kitchen Cafe
2 Tb. olive oil
3 cloves garlic, minced or pressed
1 small onion, finely chopped (1/2 - 2/3 cup)
1 stalk celery, chopped (1/4 - 1/3 cup)
1 carrot, peeled and chopped (1/3 cup)
1/2 tsp. salt
1/2 tsp. freshly ground black pepper
2 cans (28 oz. each) crushed tomatoes
1/2 Tb. dried basil
1/2 Tb. dried oregano
1/2 Tb. dried parsley
1/4 tsp. marjoram
2 dried bay leaves
1 Tb. brown sugar
2 Tb. butter
Heat oil in large pot, Add garlic, onion, celery, and carrots and cook until onion is translucent and lightly browned and veggies are tender. Add salt and pepper and stir well. Add tomatoes, basil, oregano, parsley, marjoram, and bay leaves. Simmer, covered, on low heat for about 1 hour, stirring occasionally, until sauce is thickened. remove bay leaves and stir in brown sugar and butter. Cool slightly, then blend in food processor until desired consistency is reached (I like mine fairly smooth). Make about 7 cups sauce.
Monday, October 18, 2010
Pulled Pork Sandwiches
My husband normally doesn't like pork. At all. Every once in awhile I'll throw it into the rotation just for a little variety, but I never expect him to like it a whole lot. Saturday I was craving BBQ but didn't want to go all the way outside (an entire 20 feet from my kitchen, poor me) and grill. Instead I settled on these pulled pork sandwiches. I threw everything in the crock pot in the morning, and it was perfectly cooked 8 hours later. It took less than 5 minutes of work and the results were spectacular. Juicy, smoky, flavorful, falling-apart, melt-in-your mouth tender. My husband loved these and said he never knew pork could taste so great. The leftovers lasted less than 24 hours, which is nothing short of a miracle. This definitely has our stamp of approval, and I hope you'll enjoy it as much as we did!
Pulled Pork Sandwiches
Adapted from My Kitchen Cafe
1 boneless pork shoulder or pork loin (2-3 pounds, mine was about 2 pounds and it made 6-8 sandwiches)
3/4 tsp. fresh ground black pepper
1 tsp. garlic salt
1/4 tsp. smoked paprika or chipotle chili powder (optional, but I love a little kick)
2 cups water
1 Tb. hickory flavored Liquid Smoke (you can usually find this by the Worcestershire sauce and BBQ sauce)
1 1/2 cups barbecue sauce
buns, for serving
Rinse pork in cold water and pat dry. Combine pepper, garlic salt, and paprika or chili powder. Rub all over pork shoulder, making sure to cover well. Place pork in crock pot. Cover with water and liquid smoke. Cook on low for 7-10 hours, until pork is tender and falling apart. Remove pork, drain liquid. Shred the pork and return to the crock pot and add 1 1/2 cups barbecue sauce. Stir to coat and cook on low for 20 minutes, until sauce is absorbed and heated through. Serve on buns with additional barbecue sauce if desired.
Pulled Pork Sandwiches
Adapted from My Kitchen Cafe
1 boneless pork shoulder or pork loin (2-3 pounds, mine was about 2 pounds and it made 6-8 sandwiches)
3/4 tsp. fresh ground black pepper
1 tsp. garlic salt
1/4 tsp. smoked paprika or chipotle chili powder (optional, but I love a little kick)
2 cups water
1 Tb. hickory flavored Liquid Smoke (you can usually find this by the Worcestershire sauce and BBQ sauce)
1 1/2 cups barbecue sauce
buns, for serving
Rinse pork in cold water and pat dry. Combine pepper, garlic salt, and paprika or chili powder. Rub all over pork shoulder, making sure to cover well. Place pork in crock pot. Cover with water and liquid smoke. Cook on low for 7-10 hours, until pork is tender and falling apart. Remove pork, drain liquid. Shred the pork and return to the crock pot and add 1 1/2 cups barbecue sauce. Stir to coat and cook on low for 20 minutes, until sauce is absorbed and heated through. Serve on buns with additional barbecue sauce if desired.
Subscribe to:
Posts (Atom)