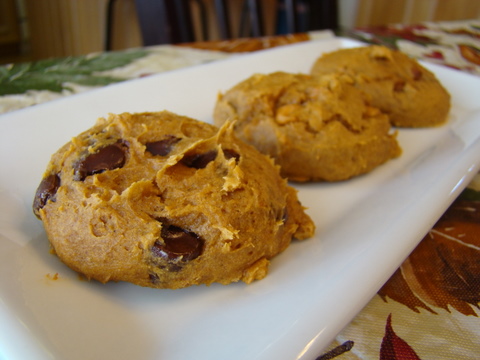
Since it's National Pancake Day, I figured that I would come back from my extra-long hiatus and actually post a recipe to celebrate today! I made these a couple days ago and could not stop eating them. I ate a couple for breakfast with maple, and then found myself snacking on them plain for the rest of the day. My almost-two-year-old daughter was giggling when I gave these to her because she was so excited (they combine her two favorite things: bananas and chocolate), and she would have eaten the rest of the batch if I had let her. They were addicting, delicious, and fairly healthy. I'll definitely be making them again soon! (And hopefully, when I do make them again, I'll get a better picture. I was trying to snap a picture on my phone while Lilia was begging to eat another one!)
Whole Wheat Banana Chocolate Chip Pancakes
barely adapted from She Bakes Here
1 cup whole wheat flour
1 tbsp white sugar
1 Tb. ground flax seed (optional, but it adds lots of awesome health benefits like omega 3s and fiber!)
2 tsp baking powder
1/2 tsp cinnamon
1/4 tsp salt
1 egg, beaten
1 cup water
2 tbsp oil
2 ripe bananas, mashed (I hate the texture of banana lumps in baked goods, so I use an immersion blender to totally liquefy the banana, but mashing them with a fork is fine too!)
1/2 tsp vanilla
1/2 cup semi-sweet chocolate chips (I used mini chocolate chips)
Combine dry ingredients in large bowl. Whisk in wet ingredients until well combined. Fold in chocolate chips. Drop by 1/4 cupfuls onto hot griddle. Cook until bubbles appear and hold their shape, then flip and continue cooking another 1-2 minutes on other side. Repeat with remaining batter. Makes about 10 pancakes.
Showing posts with label chocolate chips. Show all posts
Tuesday, February 21, 2012
Monday, July 18, 2011
S'mores Bars
I know it's completely shocking to see a new post on here after four months of absolutely nothing. I'm currently 20 weeks pregnant and I've been ridiculously sick my entire pregnancy. I haven't been cooking nearly as much as I was before (what with food sounding repulsive and all) and when I do actually whip something up, it's usually a tried-and-true recipe that is already posted on here because I know I'll like it. I'm finally feeling a little more like eating and wanting to get back in the kitchen, and I've been doing a lot more cooking. I have lots of pictures and recipes to post, and hopefully I'll find some time (and energy!) to get some of them on here.
I thought this would be a great welcome-back-to-blogging recipe to share with all of you. I remembered seeing these on another food blog a year or so ago and when I was thinking of a treat to make for our 4th of July barbecue, I knew that these would be the perfect treat. They are easy to throw together (no bonfire required!) and everyone loved them (you should have seen the looks on everyone's faces--kids and adults--when I brought these in the house, we couldn't wait to finish lunch so we could dig in to these). They are definitely not healthy, but in small doses for a fun summer treat I think they're totally worth the splurge. Enjoy!
S'mores Bars
adapted from food.com
1 bag (16 ounces) mini marshmallows, divided
1 1/2 cups milk chocolate chips or chunks (I used chopped Hershey's bars so they'd feel like authentic s'mores)
5 Tablespoons butter
1/4 cup light corn syrup
5 cups graham-flavored cereal (like Golden Grahams)
1. Line 9 x 13 inch pan with parchment paper. Spray lightly with non-stick cooking spray.
2. Reserve 1 1/2 cups mini-marshmallows. Combine remaining marshmallows, chocolate chips, butter and corn syrup in a large pot over low heat. Stir continuously until completely melted and combined (watch carefully as chocolate burns easily). Immediately stir in cereal. Cool slightly, then stir in 1 cup mini marshmallows.
3. Spread into prepared pan (I found it easiest to do this by scraping it out with a rubber spatula, and then pressing it into the pan with fingers sprayed with non-stick cooking spray--the cereal mixture is really sticky!) Sprinkle remaining 1/2 cup marshmallows over the top of the bars.
4. Cool completely, then cut into 20-24 pieces (they are really rich so you don't want to cut them too big). Sit back, relax and enjoy the taste of summer s'mores without having to stand over a fire in the heat trying to get your marshmallow cooked to perfection!
I thought this would be a great welcome-back-to-blogging recipe to share with all of you. I remembered seeing these on another food blog a year or so ago and when I was thinking of a treat to make for our 4th of July barbecue, I knew that these would be the perfect treat. They are easy to throw together (no bonfire required!) and everyone loved them (you should have seen the looks on everyone's faces--kids and adults--when I brought these in the house, we couldn't wait to finish lunch so we could dig in to these). They are definitely not healthy, but in small doses for a fun summer treat I think they're totally worth the splurge. Enjoy!
S'mores Bars
adapted from food.com
1 bag (16 ounces) mini marshmallows, divided
1 1/2 cups milk chocolate chips or chunks (I used chopped Hershey's bars so they'd feel like authentic s'mores)
5 Tablespoons butter
1/4 cup light corn syrup
5 cups graham-flavored cereal (like Golden Grahams)
1. Line 9 x 13 inch pan with parchment paper. Spray lightly with non-stick cooking spray.
2. Reserve 1 1/2 cups mini-marshmallows. Combine remaining marshmallows, chocolate chips, butter and corn syrup in a large pot over low heat. Stir continuously until completely melted and combined (watch carefully as chocolate burns easily). Immediately stir in cereal. Cool slightly, then stir in 1 cup mini marshmallows.
3. Spread into prepared pan (I found it easiest to do this by scraping it out with a rubber spatula, and then pressing it into the pan with fingers sprayed with non-stick cooking spray--the cereal mixture is really sticky!) Sprinkle remaining 1/2 cup marshmallows over the top of the bars.
4. Cool completely, then cut into 20-24 pieces (they are really rich so you don't want to cut them too big). Sit back, relax and enjoy the taste of summer s'mores without having to stand over a fire in the heat trying to get your marshmallow cooked to perfection!
Labels:
Aubrie,
bars,
chocolate,
chocolate chips,
Dessert,
graham crackers,
marshmallows
Wednesday, November 17, 2010
Chewy Chocolate Butterscotch Cookies
I have made these twice in the past month, and Corey has declared them his favorite cookies ever. I never thought that anything would replace his deep and undying love for chocolate chip cookies...but if anything was going to, it makes sense it would be these. Chewy chocolate cookies with milk chocolate, semi-sweet, and butterscotch chips? Delish. I even substituted half whole wheat flour for the regular flour in these cookies and he still raved about them (shh...don't tell!)
I made some with white chocolate chips instead of the butterscotch chips, and while they were still really good (and slightly more photogenic), the butterscotch chips are definitely better. I suppose you could try peanut butter chips too, but why ruin a perfectly good cookie with those? (We are not big peanut butter lovers here!) I made my cookies small so that I didn't feel quite as guilty eating five of them before 11:00 a.m...but you can feel free to make them larger if you so desire, just up the cooking time accordingly.
Chewy Chocolate Butterscotch Cookies
adapted from Mrs. Harding Cooks
Makes 2 1/2 dozen small cookies (I used a 1 Tb. cookie scoop)
1 stick unsalted butter, softened
1/2 cup granulated sugar
2 Tb. brown sugar
1 egg
1/2 tsp. vanilla
1/4 cup cocoa powder
1 1/4 cups flour
1/8 tsp. salt
1/2 tsp. baking powder
3/4 cup semi-sweet chocolate chips
1/4 cup milk chocolate chips
1/2 cup butterscotch chips (or white chocolate chips or peanut butter chips)
1. Preheat oven to 350. Line baking sheet with parchment paper or lightly spray with cooking spray.
2. In medium bowl cream butter and sugars until light and fluffy. Add egg and vanilla and beat until completely combined, scraping down side of bowl to ensure everything is mixed well.
3. Add cocoa powder and mix until combined. Add flour, salt, and baking powder and mix until totally combined (do not over mix). Stir in baking chips.
4. Drop by tablespoonfuls onto prepared baking pan. Bake for 8-10 minutes (mine were perfect at 9 minutes). Be sure that you don't over bake, you want them to be firm around the edges but still nice and a little gooey in the middle. I think these are best warm right of the oven (maybe because I can't possibly wait for five minutes until they cool down) but Corey likes them cool with a tall glass of milk. Either way, they are amazing!
Labels:
Aubrie,
butterscotch,
chocolate,
chocolate chips,
cookies,
Dessert
Thursday, October 21, 2010
Ridiculously Easy Pumpkin Chocolate Chip Cookies
I love pumpkin. Whether it's in pumpkin pie, pumpkin bread, pumpkin bars, pumpkin cheesecake, pumpkin gingerbread waffles, pumpkin cake, or these cookies, it always seems to hit the spot. I'll freely admit that I eat pumpkin treats all year round, but once fall hits and Halloween starts inching closer I can't think about much else (I only wish I was exaggerating). When a pumpkin craving hits and I don't have time to make anything labor-intensive, I like to whip these cookies up. There are 3 ingredients, and they can be mixed and in the oven in less than 5 minutes. This is the easiest, most fool-proof recipe I've ever made, and they couldn't be more delicious: moist, cakey, chocolatey and perfect every single time.
This time I even mixed things up and made some with cinnamon chips and butterscotch chips, as well as some with chocolate chips. They were all delicious and you better believe that I will be making these several times before winter comes!
Pumpkin Chocolate Chip Cookies
Makes 3 dozen cookies
1 can (15 oz.) pumpkin (not pumpkin pie filling, just plain old pumpkin puree)
1 (18.25 oz) spice cake mix
1 - 2 cups semi-sweet chocolate chips (or your favorite flavor)
Preheat oven to 350 degrees. Mix all ingredients (adjusting the amount of chocolate chips based on your personal taste). Drop by rounded tablespoonfuls onto greased baking pan, flatten slightly with back of spoon or fingers (otherwise they will be very round and puffy). Bake for 10 - 15 minutes (I used my 1 1/2 tablespoon cookie scoop and baked for 13 minutes and they were absolutely perfect). Enjoy!
Subscribe to:
Posts (Atom)