Along with our abundance of zucchini, we've also had a ton of fresh basil and tomatoes that we've been putting to use. My favorite use of them thus far is in this chicken. It was moist, delicious, and some of the best grilled chicken we've ever made. Which is why we've made it three times in as many weeks. It really is that good.
Buschetta Chicken
adapted from Riches to Rags
2 cloves garlic, minced
1/4 cup + 2 Tb. balsamic vinegar, divided
1/2 cup olive oil
4 small boneless skinless chicken breasts (4-6 ounces each)
4 slices mozzarella cheese
2 large tomatoes, seeded and chopped
1/4 cup basil, chiffonade (or chopped)
kosher salt and fresh ground black pepper
1. Combine garlic, balsamic vinegar, and olive oil in gallon size ziploc bag. Add chicken and marinade for at least 4 hours (or up to 24).
2. Preheat grill over medium-high heat. Mix tomatoes, remaining 2 Tb. balsamic, and basil in small bowl and set aside. Remove chicken from marinade and season generously with salt and pepper. Grill over medium heat for 5-6 minutes per side, or until instant read thermometer reads 160 degrees. Top with mozzarella cheese and grill for 1 more minute, to melt cheese. Divide tomato mixture evenly over chicken.
Showing posts with label Aubrie. Show all posts
Monday, August 27, 2012
Saturday, August 25, 2012
Chocolate Zucchini Cake
We planted two zucchini plants in our garden this year. The first day we picked anything from our garden, we picked eight zucchini. We've been getting several a day almost every day since. While I love zucchini, I can only eat it so many days in a row before I get a little sick of it. We've done zucchini fries, zucchini quesadillas, zucchini muffins, zucchini pasta, grilled zucchini, sauteed zucchini and several other iterations. But I think that this one is probably my favorite of them all.
If you happen to have a garden full of zucchini, this is the perfect use for it. And if you don't, it's good enough to wrangle some up (I'm sure you have neighbors that are willing to part with some, or you can probably find it cheap at the grocery store at this time of year). After making it seven or eight times in the last two months, I practically know the recipe by heart. It is moist and delicious, almost like a texas chocolate sheet cake in flavor, and probably one of the best chocolate cakes I've ever made. And the frosting...oh the frosting. It is amazing! I hope you love this one as much as we do!
Chocolate Zucchini Cake
barely adapted from allrecipes.com
Cake:
1/2 cup vegetable oil (I've also used melted butter or coconut oil with great results)
1 1/2 cups white sugar
2 teaspoons vanilla extract
2 cups all-purpose flour
1/2 cup unsweetened cocoa powder
1 1/2 teaspoons baking soda
1 teaspoon salt
2 cups finely shredded zucchini (no need to peel, just throw it in the food processor or shred it on the small holes in a box grater)
Frosting:
6 tablespoons unsweetened cocoa powder
1/4 cup butter, melted
2 cups confectioners' sugar
1/4 cup milk
1/2 teaspoon vanilla extract
1. Preheat oven to 350 degrees. Spray 9x13 baking pan with cooking spray.
2. In large bowl, mix sugar, vanilla, and oil. Stir in flour, cocoa powder, baking soda and salt. Mix until well combined (batter will be very dry). Stir in zucchini.
3. Spread evenly in prepared pan (the batter might still be dry at this point, but it will moisten from the zucchini. I usually just keep stirring until it moistens enough to spread it in the pan). Bake 25-30 minutes, until cake springs back when gently touched in center. Set aside to cool.
4. Make frosting by beating together cocoa and butter. Add remaining ingredients and beat on medium speed until fluffy. Spread over cake.
Tuesday, April 3, 2012
BBQ Chicken Quinoa Salad
This is one of the most delicious meals I've made in the past couple of months. Even Corey (who doesn't normally think that a salad constitutes a meal and isn't quite on-board with quinoa yet) thought that it was delicious and said he was excited to eat it again--soon. This meal is also super healthy and quick to throw together if you use leftover quinoa and chicken. If you've never made quinoa before, here is a good tutorial on how to cook it. If you're looking for another way to enjoy it--try serving it with this Honey-Balsamic Glazed Salmon. Enjoy!
BBQ Chicken Quinoa Salad
adapted from What's Gaby Cooking
serves 2
1 cup cooked quinoa
1/2 cup black beans, rinsed and drained
1/2 cup corn (fresh or frozen, thawed)
1 cup shredded, cooked BBQ chicken
1 1/2 - 2 cups baby spinach
1 avocado, diced
1/2 red bell pepper, diced
2 green onions (white and green parts), thinly sliced
2-3 Tb. BBQ sauce
2-3 Tb. ranch dressing
juice of 1/2 lime
1/8 tsp. each cumin and chipotle chili powder
fresh chopped cilantro and lime wedges for serving
1. Combine BBQ sauce, ranch dressing, lime juice, cumin and chili powder in small bowl. Stir until completely combined.
2. Toss all remaining ingredients in large bowl. Drizzle with dressing. Divide evenly onto serving plates and serve with chopped cilantro and lime wedges.
Saturday, March 24, 2012
Honey-Balsamic Glazed Salmon
This post doesn't require a lot of explanation. All I really need to say is this: this is probably my favorite dinner. To say that I love it is an understatement. The glaze is unbelievably good--the perfect mix of sweet, spicy, and tangy. It is fast and easy to throw together but tastes incredible--perfect for company or to mix up the weekly dinner rotation. My favorite way to serve the glaze is over salmon, quinoa and pan-fried spinach (it makes for a super healthy and delicious meal!), but it's also fantastic with chicken, rice, roasted potatoes, veggies, spinach...you really can't go wrong here.
A few notes:
1. I have made this with cheap $3/bottle balsamic and it turned out great, and I've also made it with more expensive balsamic and it is even better.
2. I definitely recommend using freshly squeezed orange juice, it punches up the flavor and the glaze thickens a little better, but I've also made it with orange juice from a can and it's still good that way too.
3. I usually use skinless salmon fillets, but I've also used skin-on and removed the skin after cooking (after the salmon is cooked the skin slides off really easily--I definitely don't recommend removing the skin before cooking because it is much more difficult to cut off.) I almost always have salmon in the freezer--they sell Wild Alaskan Salmon at Walmart in the freezer section for something like $5/bag. It has 4 individually frozen pieces all shrink-wrapped so you can pull out just what you need. I just thaw the salmon in the sink in warm water for 15ish minutes, remove it from the plastic, dry it, and cook it. It's super convenient!
4. I usually only cook 2-3 pieces of salmon because that's all we need for a meal, but I make the full amount of glaze so we have extra to drizzle over our quinoa/rice/veggies/etc.
I hope that you enjoy this as much as we do!
Honey-Balsamic Glazed Salmon
from The America's Test Kitchen Healthy Family Cookbook
4 (6 ounce) boneless salmon fillets
salt and pepper
olive oil cooking spray
1/4 cup fresh-squeezed orange juice
1 tsp. orange zest
3 Tb. balsamic vinegar
2 Tb. honey
1 Tb. white vinegar
1/4 tsp. red pepper flakes
1/8 tsp. dried rosemary (or 1/4 tsp. fresh, removed from stem, finely chopped)
1. Dry salmon completely with paper towels and salt and pepper to taste. Heat skillet over medium-high heat. Spray with cooking spray, then add salmon fillets. Cook for 4-5 minutes per side, or until browned and cooked through (fish should easily flake apart when poked). Remove from pan and cover with foil to keep warm.
2. Wipe out skillet with paper towels. Stir remaining ingredients together and pour into skillet. Simmer over medium heat until reduced (it should be slightly thickened and syrupy), 3-5 minutes. Add salmon back to skillet and flip to coat well. Serve salmon over quinoa or rice and drizzle with remaining glaze. Good luck not licking the plate after :)
Tuesday, March 20, 2012
Kneader's Mint Brownies
Mint + Chocolate is one of my favorite combinations. Peppermint Oreos. Andes Mints. Chocolate mint truffles. BYU mint brownies. Mint chocolate chip ice cream. But my absolute favorite of all is Kneader's chocolate chunk mint brownies. I could literally eat them every day and be absolutely happy (and, unfortunately, very fat). A couple of weeks ago I was at Kneader's and the line was ridiculously long and I had two fussy kids so I didn't end up getting my brownie. I couldn't stop thinking about that brownie, and was craving it all week long, so I decided to consult my good friend google to see if I could find a recipe and make some at home. I came across this recipe and decided to make it. Best. Idea. Ever. These are every bit as delicious as the ones they sell, and now having the ability to make them myself is dangerous knowledge. Deliciously dangerous knowledge.
I think that these are best a day or two after making them (the brownie layer sets up just right so they're not quite so fudgy), so they are the perfect make-ahead treat!
Kneader's Mint Brownies
barely adapted from Girls with Recipes
Brownie Layer:
1 cup butter
4 oz. unsweetened chocolate
2 cups sugar
1 tsp. vanilla
1/4 tsp. salt
4 eggs
1 cup all-purpose flour
2 cups semi-sweet chocolate chips (I have used less than this, about 2/3 cup, and thought they still turned out just as good)
Frosting Layer:
1/2 cup butter, softened
2 cups powdered sugar
2-4 Tb. milk (as needed until frosting reaches desired consistency)
1 - 1 1/2 tsp. peppermint or mint extract (use 1 tsp. for less minty brownies or 1 1/2 tsp. for more minty ones. They do peppermint ones at Christmas time and mint ones the rest of the year.)
2 drops green or red food coloring (red for peppermint or green for mint)
Chocolate Ganache:
1/2 cup semi-sweet chocolate chips
1/4 cup heavy cream (or butter if you don't have cream on hand)
1. Preheat oven to 350 degrees. Line 9 x 13 baking pan with parchment paper or foil. Spray with non-stick spray. Melt chocolate and butter in microwave on high for 2-3 minutes, stirring every 30 seconds, until completely melted. Add sugar, eggs, and vanilla. Mix until completely combined. Gently fold in flour and salt until just combined. Fold in chocolate chips. Bake 25 - 30 minutes (do not overcook). Cool completely.
2. When brownie layer is completely cooled, prepare mint frosting. Beat all ingredients together with mixer until light and fluffy, adding milk as needed to reach desired consistency. Using an offset spatula, spread over cooled brownies (make sure you spread it evenly so the top ganache layer will work right). Refrigerate for at least 1 hour.
3. Make ganache layer by heating cream and chocolate chips in microwave for 30 seconds, then stir completely until totally melted and combined (microwave for up to 30 more seconds if needed). Cool slightly, then spread evenly over mint layer. Do not refrigerate, ganache will set up within about an hour.
Sunday, March 18, 2012
Key Lime Pie
This is easily the best key lime pie I've ever had, and it is also the easiest! I made it for Christmas and have been waiting for Pi Day to make it again (March 14th = 3.14 = pi for those of you that might not be math nerds like me). It was definitely worth the wait and I'm glad that I had lots of other people there to eat it with me so I didn't eat the whole thing myself! I only got one picture of the pie because it disappeared so quickly...and in a room full of pies, that's saying something!
A quick note: the first time I made this I used fat free sweetened condensed milk and low-fat sour cream. It tasted great, but the textured was just a little grainy. This time I used full-fat milk and sour cream and it was perfectly smooth and creamy. Either way will work, you just have to decide whether you want to sacrifice the texture to save some calories!
Key Lime Pie
adapted from Allrecipes
8" prepared graham cracker crust (I always buy Honeymaid brand because it's the only one I've found that doesn't have trans fat)
2 cups sweetened condensed milk (about 1 1/2 cans)
1/2 cup key lime juice (I used bottled, Nellie and Joe's Brand is the best!)
1/3 cup sour cream
Preheat oven to 350 degrees. Whisk together milk, lime juice, and sour cream in large bowl until smooth. Pour into prepared crust and bake for 5-8 minutes, until tiny pinholes form on the top of the pie. Cool completely and garnish with whipped cream and lime slices.
Tuesday, February 28, 2012
Nutella-Yogurt Fruit Dip
In case you haven't noticed, I kind of have a thing for Nutella. But let's be honest here: it's not exactly the healthiest food in the world. However, when you combine it with protein-rich, fat-free Greek yogurt and use it as a dip for fruit, it takes away a little bit of the guilt but still tastes amazing. This dip couldn't be easier and is SO delicious. It is thick, rich, and creamy--I think it tastes kind of like Nutella cheesecake.
Use it as a dip for fruit--I love it with bananas, strawberries, oranges, and apples, and it's also good with fresh pineapple, kiwi, and probably any other fruit you can think of. We also dipped pretzels, marshmallows, and graham crackers in it. I even used some as a topping on some whole-wheat waffles with strawberries and bananas, and I think it would be amazing stuffed inside of crepes. You really can't go wrong here--anything dipped in this magical stuff is bound to be delicious!
Nutella-Yogurt Fruit Dip
1/2 cup Nutella
1 cup Fat-Free Plain Greek Yogurt
Mix until completely combined. (If the Nutella is extra thick I microwave it for about 10 seconds so it's easier to stir.) Serve with fresh fruit for dipping. Refrigerate any leftovers for up to one week.
Tuesday, February 21, 2012
Whole Wheat Banana Chocolate Chip Pancakes
Since it's National Pancake Day, I figured that I would come back from my extra-long hiatus and actually post a recipe to celebrate today! I made these a couple days ago and could not stop eating them. I ate a couple for breakfast with maple, and then found myself snacking on them plain for the rest of the day. My almost-two-year-old daughter was giggling when I gave these to her because she was so excited (they combine her two favorite things: bananas and chocolate), and she would have eaten the rest of the batch if I had let her. They were addicting, delicious, and fairly healthy. I'll definitely be making them again soon! (And hopefully, when I do make them again, I'll get a better picture. I was trying to snap a picture on my phone while Lilia was begging to eat another one!)
Whole Wheat Banana Chocolate Chip Pancakes
barely adapted from She Bakes Here
1 cup whole wheat flour
1 tbsp white sugar
1 Tb. ground flax seed (optional, but it adds lots of awesome health benefits like omega 3s and fiber!)
2 tsp baking powder
1/2 tsp cinnamon
1/4 tsp salt
1 egg, beaten
1 cup water
2 tbsp oil
2 ripe bananas, mashed (I hate the texture of banana lumps in baked goods, so I use an immersion blender to totally liquefy the banana, but mashing them with a fork is fine too!)
1/2 tsp vanilla
1/2 cup semi-sweet chocolate chips (I used mini chocolate chips)
Combine dry ingredients in large bowl. Whisk in wet ingredients until well combined. Fold in chocolate chips. Drop by 1/4 cupfuls onto hot griddle. Cook until bubbles appear and hold their shape, then flip and continue cooking another 1-2 minutes on other side. Repeat with remaining batter. Makes about 10 pancakes.
Whole Wheat Banana Chocolate Chip Pancakes
barely adapted from She Bakes Here
1 cup whole wheat flour
1 tbsp white sugar
1 Tb. ground flax seed (optional, but it adds lots of awesome health benefits like omega 3s and fiber!)
2 tsp baking powder
1/2 tsp cinnamon
1/4 tsp salt
1 egg, beaten
1 cup water
2 tbsp oil
2 ripe bananas, mashed (I hate the texture of banana lumps in baked goods, so I use an immersion blender to totally liquefy the banana, but mashing them with a fork is fine too!)
1/2 tsp vanilla
1/2 cup semi-sweet chocolate chips (I used mini chocolate chips)
Combine dry ingredients in large bowl. Whisk in wet ingredients until well combined. Fold in chocolate chips. Drop by 1/4 cupfuls onto hot griddle. Cook until bubbles appear and hold their shape, then flip and continue cooking another 1-2 minutes on other side. Repeat with remaining batter. Makes about 10 pancakes.
Labels:
Aubrie,
bananas,
Breakfast,
chocolate chips,
healthy
Wednesday, September 14, 2011
Peach Cobbler Muffins
When I was growing up, my grandpa had an orchard. I remember him growing apples, peaches, and cherries, and whenever we went to his house it seemed like there was always some kind of fruit that he had out, ready to share with us. I remember going out to the orchard during the summer and helping pick cherries, and eating them until my stomach hurt (he probably lost more money on the cherries we ate than he made from the ones that we picked and he was able to sell). I remember as summer faded away and fall approached, getting excited to see the boxes of apples and peaches and knowing that my mom would be canning them and we'd be eating them all winter long.
Although my grandpa's orchard has long since been turned into a housing development, I still find myself looking forward to the changing of the seasons and the delicious fruit that comes along with it. Luckily for me, the "apple doesn't fall far from the tree" and my dad shares his dad's love of growing fruit, and he has planted all sorts of fruit trees in his backyard. He keeps us well stocked with fresh, flavorful, homegrown fruit and we always look forward to going to his house to see what good things he has to send home with us that week.
The past couple of weeks, he's been sending us home with fresh, ripe, juicy peaches. My little 16-month old absolutely loves fresh peaches, and could easily eat at least one a day by herself, so we go through peaches fast around here. Last time he sent us some peaches, though, I was able to hide a few from my daughter and make these muffins, and I'm so glad I did! They were the perfect good-bye-to-summer and hello-to-fall food. They were moist, juicy, cinnamony. They captured the deliciousness of peach cobbler exactly, but in a portable, healthier, breakfast-approved way. The streusel is totally optional (if you want the muffins to be even healthier, feel free to omit it) but we loved it with the streusel on top. We all devoured these, and the neighbors that I shared them with also gave them rave reviews. These are definitely best the first day, so make sure you have someone to share them with, or cut the batch in half because it makes a lot. Either way, just make sure you make these while you can still get fresh, juicy peaches--you won't regret it!
Peach Cobbler Muffins
makes 24-28 muffins
wildly adapted from here
muffins:
3 cups flour (I used half whole wheat and half regular)
1 Tb. cinnamon
1 tsp. baking soda
1 tsp. salt
1 cup applesauce
1/4 cup oil
3 eggs
1 cup sugar
1/2 cup milk
2 1/2 cups peeled, pitted, and diced chopped peaches
Preheat oven to 400 degrees. Line muffin cups with paper liners.
In large bowl mix flour, cinnamon, baking soda, and salt. In separate bowl mix the oil, applesauce, eggs, and sugar. Stir the oil mixture into the flour mixture just until moist. Stir in milk. Fold in the peaches. Spoon into prepared cups, filling each about 2/3 full. Top each muffin with 2 - 3 tsp. streusel (recipe below) and press down lightly with fingers to adhere the streusel to the muffin batter. Bake 20-25 minutes or until tops of muffins spring back when you touch them and toothpick inserted in center comes out mostly clean.
Streusel topping:
1/3 cup oatmeal
1/3 cup whole wheat flour
1/3 cup brown sugar
1/4 cup butter, cold and cut into small pieces
Combine all ingredients with fingers, fork, or pastry blender until it resembles small crumbs. Use as directed above.
Monday, July 18, 2011
S'mores Bars
I know it's completely shocking to see a new post on here after four months of absolutely nothing. I'm currently 20 weeks pregnant and I've been ridiculously sick my entire pregnancy. I haven't been cooking nearly as much as I was before (what with food sounding repulsive and all) and when I do actually whip something up, it's usually a tried-and-true recipe that is already posted on here because I know I'll like it. I'm finally feeling a little more like eating and wanting to get back in the kitchen, and I've been doing a lot more cooking. I have lots of pictures and recipes to post, and hopefully I'll find some time (and energy!) to get some of them on here.
I thought this would be a great welcome-back-to-blogging recipe to share with all of you. I remembered seeing these on another food blog a year or so ago and when I was thinking of a treat to make for our 4th of July barbecue, I knew that these would be the perfect treat. They are easy to throw together (no bonfire required!) and everyone loved them (you should have seen the looks on everyone's faces--kids and adults--when I brought these in the house, we couldn't wait to finish lunch so we could dig in to these). They are definitely not healthy, but in small doses for a fun summer treat I think they're totally worth the splurge. Enjoy!
S'mores Bars
adapted from food.com
1 bag (16 ounces) mini marshmallows, divided
1 1/2 cups milk chocolate chips or chunks (I used chopped Hershey's bars so they'd feel like authentic s'mores)
5 Tablespoons butter
1/4 cup light corn syrup
5 cups graham-flavored cereal (like Golden Grahams)
1. Line 9 x 13 inch pan with parchment paper. Spray lightly with non-stick cooking spray.
2. Reserve 1 1/2 cups mini-marshmallows. Combine remaining marshmallows, chocolate chips, butter and corn syrup in a large pot over low heat. Stir continuously until completely melted and combined (watch carefully as chocolate burns easily). Immediately stir in cereal. Cool slightly, then stir in 1 cup mini marshmallows.
3. Spread into prepared pan (I found it easiest to do this by scraping it out with a rubber spatula, and then pressing it into the pan with fingers sprayed with non-stick cooking spray--the cereal mixture is really sticky!) Sprinkle remaining 1/2 cup marshmallows over the top of the bars.
4. Cool completely, then cut into 20-24 pieces (they are really rich so you don't want to cut them too big). Sit back, relax and enjoy the taste of summer s'mores without having to stand over a fire in the heat trying to get your marshmallow cooked to perfection!
I thought this would be a great welcome-back-to-blogging recipe to share with all of you. I remembered seeing these on another food blog a year or so ago and when I was thinking of a treat to make for our 4th of July barbecue, I knew that these would be the perfect treat. They are easy to throw together (no bonfire required!) and everyone loved them (you should have seen the looks on everyone's faces--kids and adults--when I brought these in the house, we couldn't wait to finish lunch so we could dig in to these). They are definitely not healthy, but in small doses for a fun summer treat I think they're totally worth the splurge. Enjoy!
S'mores Bars
adapted from food.com
1 bag (16 ounces) mini marshmallows, divided
1 1/2 cups milk chocolate chips or chunks (I used chopped Hershey's bars so they'd feel like authentic s'mores)
5 Tablespoons butter
1/4 cup light corn syrup
5 cups graham-flavored cereal (like Golden Grahams)
1. Line 9 x 13 inch pan with parchment paper. Spray lightly with non-stick cooking spray.
2. Reserve 1 1/2 cups mini-marshmallows. Combine remaining marshmallows, chocolate chips, butter and corn syrup in a large pot over low heat. Stir continuously until completely melted and combined (watch carefully as chocolate burns easily). Immediately stir in cereal. Cool slightly, then stir in 1 cup mini marshmallows.
3. Spread into prepared pan (I found it easiest to do this by scraping it out with a rubber spatula, and then pressing it into the pan with fingers sprayed with non-stick cooking spray--the cereal mixture is really sticky!) Sprinkle remaining 1/2 cup marshmallows over the top of the bars.
4. Cool completely, then cut into 20-24 pieces (they are really rich so you don't want to cut them too big). Sit back, relax and enjoy the taste of summer s'mores without having to stand over a fire in the heat trying to get your marshmallow cooked to perfection!
Labels:
Aubrie,
bars,
chocolate,
chocolate chips,
Dessert,
graham crackers,
marshmallows
Wednesday, March 16, 2011
Herb Roasted Potatoes
Corey loves meat and potatoes, but for some reason I don't make them very much. However, I started making roasted potatoes a few months ago and Corey has been in heaven. It doesn't matter what I serve them with (in fact, a couple of nights ago I just made the potatoes and veggies and he was still happy. If you know Corey, you know it's all sorts of incredible for him to enjoy a meal without meat!) I finally perfected the recipe and Corey made sure that I wrote it down so that these ("best potatoes you've ever made") make it on to our dinner table more frequently.
Herb Roasted Potatoes
Serves 3-4
2 lbs. baby red or yellow potatoes, washed and quartered
2 Tb. olive oil
1/2 onion, thinly sliced
1 tsp. fresh rosemary, finely minced (or 1/2 tsp. dried)
1 tsp. smoked paprika
1 tsp. garlic salt
1/2 tsp. dried parsley (or 2 tsp. fresh)
1/2 tsp. fresh ground black pepper
2 Tb. Parmesan cheese, grated
Combine all ingredients in a gallon-size Ziploc bag and shake until well coated and combined. Spread potatoes evenly on baking pan. Bake at 400 degrees for 35-40 minutes or until crispy, stirring halfway through. Enjoy!
Herb Roasted Potatoes
Serves 3-4
2 lbs. baby red or yellow potatoes, washed and quartered
2 Tb. olive oil
1/2 onion, thinly sliced
1 tsp. fresh rosemary, finely minced (or 1/2 tsp. dried)
1 tsp. smoked paprika
1 tsp. garlic salt
1/2 tsp. dried parsley (or 2 tsp. fresh)
1/2 tsp. fresh ground black pepper
2 Tb. Parmesan cheese, grated
Combine all ingredients in a gallon-size Ziploc bag and shake until well coated and combined. Spread potatoes evenly on baking pan. Bake at 400 degrees for 35-40 minutes or until crispy, stirring halfway through. Enjoy!
Tuesday, March 8, 2011
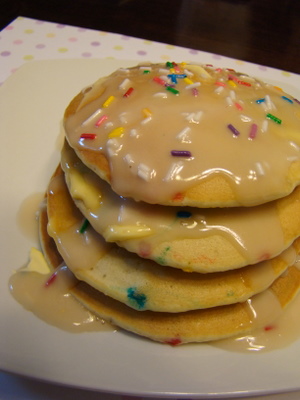
Birthday Cake Pancakes
I have a serious weakness for funfetti cake. You know, the kind from a box that you can buy at the grocery store for less than $2. They are my absolute favorite. I kid you not when I say that I could eat an entire box by myself in less than 48 hours. I know it's not high-class to crave boxed cake mix, but who am I kidding? I'm not exactly high class. I love food, and in my own personal opinion this is some of the best.
When I saw a recipe online for cake batter pancakes, using cake mix from a box...I couldn't resist. In fact, I didn't even make it three days without making these. And I didn't last a week after that without making them again. They are clearly not the healthiest breakfast...but for an occasional indulgence they are awesome (I'm thinking birthdays, because I want to eat birthday cake for breakfast on my birthday anyway, so why not birthday cake pancakes instead?) As a bonus, the leftovers are awesome as a mid-day snack. I hope you enjoy them as much as I have!
Birthday Cake Pancakes
adapted from How Sweet It Is
1 cup all-purpose flour
1 cup yellow or white cake mix
2 Tb. granulated sugar
3/4 tsp. baking powder
1/4 tsp. salt
2 eggs
2 Tb. oil
1 1/2 tsp. vanilla
1/4 tsp. almond extract
1 -2 cups milk (you may need more or less depending on the brand of cake mix that you use, I used 1 1/4 cups)
1/4 - 1/3 cups multi-colored sprinkles (the big fat ones, they're called "jimmies." If you use little ones they will dissolve too quickly and you won't be able to see the pretty streaks of color)
1. Whisk together dry ingredients in medium mixing bowl. Add eggs, oil, vanilla, almond extract and milk (start with about 1 cup and add more as needed to get desired consistency). Stir in sprinkles.
2. Preheat skillet to medium and spray with non-stick cooking spray. Drop batter by 1/4 cup-fuls onto hot skillet. Cook until bubbles form and stick on top and bottom is golden brown. Flip and cook for about 1 more minute or until golden brown on other side. Serve warm with butter and vanilla glaze (below) or maple syrup.
Vanilla Glaze
2 cups powdered sugar
1 tsp. vanilla
1/4 tsp. almond extract
3-4 Tb. multi-colored sprinkles
1-2 Tb. milk
Stir all ingredients together until smooth. Drizzle over pancakes.
When I saw a recipe online for cake batter pancakes, using cake mix from a box...I couldn't resist. In fact, I didn't even make it three days without making these. And I didn't last a week after that without making them again. They are clearly not the healthiest breakfast...but for an occasional indulgence they are awesome (I'm thinking birthdays, because I want to eat birthday cake for breakfast on my birthday anyway, so why not birthday cake pancakes instead?) As a bonus, the leftovers are awesome as a mid-day snack. I hope you enjoy them as much as I have!
Birthday Cake Pancakes
adapted from How Sweet It Is
1 cup all-purpose flour
1 cup yellow or white cake mix
2 Tb. granulated sugar
3/4 tsp. baking powder
1/4 tsp. salt
2 eggs
2 Tb. oil
1 1/2 tsp. vanilla
1/4 tsp. almond extract
1 -2 cups milk (you may need more or less depending on the brand of cake mix that you use, I used 1 1/4 cups)
1/4 - 1/3 cups multi-colored sprinkles (the big fat ones, they're called "jimmies." If you use little ones they will dissolve too quickly and you won't be able to see the pretty streaks of color)
1. Whisk together dry ingredients in medium mixing bowl. Add eggs, oil, vanilla, almond extract and milk (start with about 1 cup and add more as needed to get desired consistency). Stir in sprinkles.
2. Preheat skillet to medium and spray with non-stick cooking spray. Drop batter by 1/4 cup-fuls onto hot skillet. Cook until bubbles form and stick on top and bottom is golden brown. Flip and cook for about 1 more minute or until golden brown on other side. Serve warm with butter and vanilla glaze (below) or maple syrup.
Vanilla Glaze
2 cups powdered sugar
1 tsp. vanilla
1/4 tsp. almond extract
3-4 Tb. multi-colored sprinkles
1-2 Tb. milk
Stir all ingredients together until smooth. Drizzle over pancakes.
Friday, February 25, 2011
Peanut Butter Kiss Cookies
Remember these classic cookies? Five ingredients, 20 minutes, and you're on your way to warm peanut-buttery and chocolatey goodness. These totally hit the spot when I found myself having an unexpected peanut butter craving a couple weeks ago (I'm normally not a big peanut butter lover, but I had to have peanut butter cookies immediately). I'm thinking about trying these again but with Nutella instead of peanut butter...I'll keep you posted with how they turn out!
Peanut Butter Kiss Cookies
adapted from allrecipes
1 cup peanut butter
1 cup white sugar
1 egg
1 tsp. vanilla
18 milk chocolate kisses, unwrapped.
1. Preheat oven to 350 degrees. Line baking sheet with parchment paper or spray with non-stick cooking spray.
2. With electric mixer, combine all ingredients except kisses. Beat on medium until completely combined. Roll into 1" balls and place on prepared baking sheet.
3. Bake for 10 minutes. Remove from oven and immediately press 1 chocolate kiss in the center of each cookie. A big glass of milk is a MUST with these!
Labels:
Aubrie,
chocolate,
cookies,
Dessert,
peanut butter
Tuesday, February 15, 2011
Mini White Chocolate-Raspberry Cheesecakes
My brother is getting married to a fabulous girl, Cami, next month. My sisters, my mom and I threw a bridal shower for her last weekend. Cami isn't much of a dessert fan, but she does love cheesecake. I knew I needed to make some kind of cheesecake for the shower. I wanted it to be cute and bite-sized, and I wanted to incorporate raspberries (my favorite). I adapted my favorite cheesecake recipe from Kraft Foods and came up with this delicious and beautiful dessert. It was the hit of the party, and everyone loved it. I hope you will too.
Mini White Chocolate-Raspberry Cheesecakes
Makes 24 mini cheesecakes
3/4 cup vanilla wafers, finely crushed
2 Tb. butter, melted
1/4 cup sugar
1 pkg. (8 oz) cream cheese, softened
1 tsp. vanilla
1/4 cup sour cream
1 large egg
2 Tb. white chocolate, melted and cooled
1/4 cup raspberries, fresh or frozen and thawed
1 Tb. sugar
1. Preheat oven to 350 degrees. Line 24 mini muffin cups with paper liners. Mix vanilla wafers and melted butter, and divide evenly between liners (about 1/2 Tb. or 1-1/2 tsp. each). Press crust down lightly with fingertips.
2. Beat cream cheese and sugar in medium bowl with electric mixer until well blended. Add vanilla and sour cream and beat until blended. Add egg and mix on low speed until just blended, scraping sides of bowl to mix completely. Divide cream cheese filling evenly between muffin cups (about 1 - 1 1/2 Tb. per cup).
3. Blend raspberries with mini chopper or immersion blender until completely blended. Press through fine mesh strainer to remove seeds, and mix with sugar. Dot each cheesecake with a couple of drops of the raspberry puree, then swirl carefully with a toothpick.
4. Bake for 15-17 minutes or until just barely set. Let stand at room temperature until completely cool, about 30 minutes, then move to refrigerator and chill for at least 6 hours. Serve with fresh raspberries.
Mini White Chocolate-Raspberry Cheesecakes
Makes 24 mini cheesecakes
3/4 cup vanilla wafers, finely crushed
2 Tb. butter, melted
1/4 cup sugar
1 pkg. (8 oz) cream cheese, softened
1 tsp. vanilla
1/4 cup sour cream
1 large egg
2 Tb. white chocolate, melted and cooled
1/4 cup raspberries, fresh or frozen and thawed
1 Tb. sugar
1. Preheat oven to 350 degrees. Line 24 mini muffin cups with paper liners. Mix vanilla wafers and melted butter, and divide evenly between liners (about 1/2 Tb. or 1-1/2 tsp. each). Press crust down lightly with fingertips.
2. Beat cream cheese and sugar in medium bowl with electric mixer until well blended. Add vanilla and sour cream and beat until blended. Add egg and mix on low speed until just blended, scraping sides of bowl to mix completely. Divide cream cheese filling evenly between muffin cups (about 1 - 1 1/2 Tb. per cup).
3. Blend raspberries with mini chopper or immersion blender until completely blended. Press through fine mesh strainer to remove seeds, and mix with sugar. Dot each cheesecake with a couple of drops of the raspberry puree, then swirl carefully with a toothpick.
4. Bake for 15-17 minutes or until just barely set. Let stand at room temperature until completely cool, about 30 minutes, then move to refrigerator and chill for at least 6 hours. Serve with fresh raspberries.
Labels:
Aubrie,
cheesecake,
chocolate,
cream cheese,
Dessert,
Raspberries
Monday, January 31, 2011
Chocolate Fondue
Fondue is one of my absolute favorite desserts. It's easy, delicious and fun, and what doesn't taste better dipped in chocolate? I got this recipe from a friend and have literally made it dozens of times since.
Chocolate Fondue
1 cup (6 oz.) semi-sweet chocolate chips
1/2 tsp. vanilla
1 Tb. sugar
1/2 cup whipping cream
Combine chocolate chips, vanilla, and sugar in a medium bowl. In small bowl, heat whipping cream in microwave for 30-45 seconds, or until just barely boiling. Pour over chocolate chip mixture. Let stand for 1 minutes, then stir until chocolate is completely melted. Serve warm with dippers of your choice, such as: strawberries, kiwi, pineapple, marshmallows, graham crackers, brownies, angel food cake cubes, etc.
Chocolate Fondue
1 cup (6 oz.) semi-sweet chocolate chips
1/2 tsp. vanilla
1 Tb. sugar
1/2 cup whipping cream
Combine chocolate chips, vanilla, and sugar in a medium bowl. In small bowl, heat whipping cream in microwave for 30-45 seconds, or until just barely boiling. Pour over chocolate chip mixture. Let stand for 1 minutes, then stir until chocolate is completely melted. Serve warm with dippers of your choice, such as: strawberries, kiwi, pineapple, marshmallows, graham crackers, brownies, angel food cake cubes, etc.
Monday, January 24, 2011
Clam Chowder
My mom makes fantastic clam chowder, all of us (well, except for my little sister that is allergic to shellfish) love it every time she makes it. I finally learned how to make it on my own. I made a couple of adjustments based on a recipe I found on allrecipes (in italics, feel free to make them without if you want, they just add a little more depth of flavor) but otherwise it it really close to my mom's famous recipe. Enjoy!
Clam Chowder
6 slices bacon
3 cans minced clams (6.5 ounces each)
1 1/4 cups onion, finely chopped
1 1/2 cups celery, chopped
1 cup carrots, diced
3-4 cups potatoes, diced
6 Tb. butter
1 cup all-purpose flour
1 quart half-and-half
1 tsp. seasoned salt
1 tsp. salt
1 tsp. freshly ground black pepper
2 Tb. red wine vinegar
1. Cook bacon in large stockpot until crispy. Remove bacon, but do not drain. In same pan, add onion, celery, carrots and potatoes. Drain juice from clams over veggies and add water until veggies are just barely covered. Cook over medium heat until veggies are all tender. Do not drain water.
2. Meanwhile in large saucepan melt butter over medium heat. Whisk in flour until smooth. Slowly add half-and-half and stir continually until thick and smooth (mixture will be very thick). Add to veggie/clam juice/water mixture. Heat through, but do not boil. Crumble cooled bacon and add to soup along with clams (if the clams cook too much, they will get tough, so add them right before serving). Add seasoned salt, salt, black pepper and vinegar if desired. Adjust seasonings to taste.
Thursday, January 13, 2011
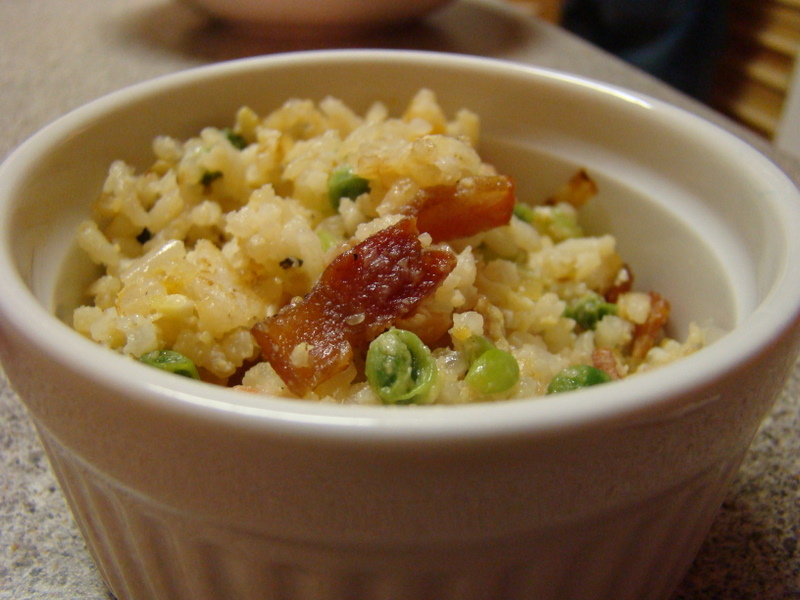
Fried Rice
This is a great side dish to go along with Asian-style entrees (like this sticky chicken or these sweet and sour meatballs or these bacon-wrapped chicken and pineapple skewers or this orange chicken). It is also the perfect accompaniment for stir-fried vegetables and sweet-and-sour sauce (I know it might be weird, but I just love the sweet-and-sour sauce poured all over the rice). I make this all the time, sometimes with other entrees, sometimes just on it's own as a stand-alone meal. It's very easy to adapt to whatever meat (feel free to use ham instead of bacon or omit the meat entirely) or veggies you might have on hand. Here is my favorite version, but feel free to fiddle with it to make it how you like.
Fried Rice
serves 3-4
4 pieces bacon
1/4 cup finely chopped onions
1/4 cup finely chopped celery
1/4 cup finely chopped carrots
1/3 cup frozen peas
3 cups cooked rice
1 egg
1-2 Tb. soy sauce
salt and pepper to taste
1. Cook in large skillet until crisp. Remove bacon, set aside to cool and crumble.
2. Heat same skillet (without draining grease) to medium. Add onions, celery, and carrots and cook for 2 minutes. Add peas and cook for 3-4 more minutes, until veggies are translucent and peas are thawed.
3. Add rice and stir to break up and heat through.
4. In separate small bowl, beat egg. Pour over top of rice in skillet and continue stirring until egg is completely cooked through. Add soy sauce and salt and pepper to taste. Enjoy!
Monday, January 10, 2011
Nutella Cheesecake Swirl Brownies
Have I mentioned that I have a love affair with Nutella? Whether on crepes, in stuffed french toast, in gelato, or in the world's most delicious frosting, I cannot get enough of it. So naturally, when I saw a recipe for Peanut Butter Cheesecake Swirl Brownies on one of my favorite blogs (Annies Eats!) I immediately had to make them, but with Nutella instead of peanut butter. Thus, these were born. They are probably the most rich dessert I have ever made (and that is definitely saying something). You absolutely have to eat these with a tall glass of milk or a big scoop of vanilla ice cream. Indulgent. Easy. Delicious. Hope you enjoy!
Nutella Cheesecake Swirl Brownies
Adapted from Annie's Eats, originally from Kitchenist
Brownies:
7 Tb. unsalted butter
3 oz. semi-sweet chocolate, coarsely chopped
1/2 cup cocoa powder
1 cup sugar
3 oz. cream cheese, softened
3 large eggs
1 tsp. vanilla
1/4 tsp. salt
1/2 cup flour
Cheesecake:
4 oz. cream cheese, softened
1/3 cup Nutella
1 Tb. sugar
1 egg yolk
1/2 tsp. vanilla
1. Preheat oven to 350. Line 8x8 inch pan with foil and spray with cooking spray.
2. Combine butter and chocolate in medium microwave-safe bowl. Microwave for 1 minute, then stir well until completely melted. Whisk in all remaining brownie ingredients except flour. Stir until smooth and well blended. Gently stir in flour until just combined (do not over mix). Spread evenly in prepared pan.
3. Make the Nutella cheesecake filling by beating the cream cheese, Nutella, and sugar with electric mixer on medium speed until smooth and combined. Add egg yolk and vanilla and mix until completely blended.
4. Drop spoonfuls of the Nutella filling over the brownies in pan. Swirl batter gently with a knife.
5. Bake 30-35 minutes or until the center is just set. Cool to room temperature and move to refrigerator. These are best after chilling for at least 12 hours.
Labels:
Aubrie,
Brownies,
cheesecake,
chocolate,
cream cheese,
Dessert,
nutella
Wednesday, December 15, 2010
Green Beans with Bacon and Mushrooms
I made this dish three times in less than two weeks...it really was that delicious. Simple ingredients, but together it tastes absolutely delicious. Corey was telling me about a dish his mom used to make with bacon and green beans, and that he really liked it. I took that idea and threw this together based on what we had and what sounded good to me. Corey liked it so much he gave it five stars (out of five. And yes, I really do make my husband rate the food I make every single time I cook. I'm probably crazy, but it lets me know how much he likes or dislikes something and whether I should make it again or not). Yes, Corey actually rated a vegetable five stars, which I didn't know was possible. I have a feeling this is going to be making a very regular appearance on our dinner table.
Green Beans with Bacon and Mushrooms
Serves 4-6 as a side dish...unless your name is Corey...then this will serve two :)
5 oz. bacon (about 5 slices), diced (uncooked)
1 lb. fresh green beans, rinsed, trimmed, and broken into pieces
1/3 cup red onion, thinly sliced
4 oz. fresh mushrooms, thinly sliced
garlic salt and fresh ground black pepper, to taste
Heat a skillet over medium heat. Cook bacon until nicely browned but not quite crispy, 5-7 minutes. Add green beans and onions. Cook until green beans are slightly tender, but still crisp (about 10 minutes). Add mushrooms and cook for 3-4 more minutes. Season with garlic salt and freshly ground black pepper to taste. Enjoy!
Green Beans with Bacon and Mushrooms
Serves 4-6 as a side dish...unless your name is Corey...then this will serve two :)
5 oz. bacon (about 5 slices), diced (uncooked)
1 lb. fresh green beans, rinsed, trimmed, and broken into pieces
1/3 cup red onion, thinly sliced
4 oz. fresh mushrooms, thinly sliced
garlic salt and fresh ground black pepper, to taste
Heat a skillet over medium heat. Cook bacon until nicely browned but not quite crispy, 5-7 minutes. Add green beans and onions. Cook until green beans are slightly tender, but still crisp (about 10 minutes). Add mushrooms and cook for 3-4 more minutes. Season with garlic salt and freshly ground black pepper to taste. Enjoy!
Wednesday, December 8, 2010
Breakfast Casserole
We had this breakfast casserole at a brunch after a baby blessing a couple of weeks ago. When Corey took his first bite he let out a big, contented sigh and said it was amazing. He then told me another 4+ times in the next 10 minutes how delicious it was. And then he did something totally unexpected. He went up to my friend's mom and asked her for the recipe, then immediately requested that I make it for dinner that night. No, I'm not joking.
This is easy and delicious, although it does take awhile to bake. But it is definitely worth it. This would be a great breakfast on Christmas morning, or any morning when you're going to be hanging around the house for awhile and will have enough time to wait for it to cook. This also makes great leftovers, so you could even bake it the night before and pop it in the oven the next morning for 15-30 minutes, until heated through and the cheese is warm and bubbly.
Breakfast Casserole
recipe from Julie Argyle
1 pkg. (24-26 oz.) frozen hash browns
1/2 cup butter
1 lb. deli ham, cubed (or breakfast sausage or bacon, cooked and crumbled...or a combination of the three)
6 eggs
1 1/2 cups milk
1/2 tsp. salt
2 cups grated cheddar cheese
1. Preheat oven to 425 degrees. Spray 9x13 baking dish with cooking spray. Spread frozen hash browns evenly in the pan. Thinly slice butter and place evenly over the hash browns (or melt butter and pour over the top of the hash browns). Bake for 25 minutes.
2. Remove hash browns from oven and turn temperature down to 350 degrees. Top hash browns evenly with ham (or sausage/bacon/or a combo).
3. Mix eggs,milk, and salt until completely combined. Pour over hash browns and meat in prepared pan. Return to oven and bake for 30 - 40 minutes, or until set and eggs are completely cooked. Top evenly with cheese and return to oven for 3-5 minutes or until cheese is completely melted.
Subscribe to:
Posts (Atom)